At AMSOIL, we like to do things big. And when it comes to the world of Snocross, Scott Judnick of Judnick Motorsports likes to do things just as big. Check out his story below.
Twenty-two years ago, Scott Judnick took his sons racing. Within just a few years he was running a rig across the country to race. His two sons developed into professional riders complete with mechanics and trailers set-up for the AMSOIL Championship Snocross Series. Find Judnick anywhere on the track or in the pits and you are sure to be greeted with a smile and a “How are ya?”
For Judnick, it’s all about the people within the racing community. Fielding the dreams of the three young racers on his team is just a bonus.
Overcoming Adversity
Judnick went into the 2018-19 Snocross season with notable riders expected to dominate the Pro, Pro Lite and Sport classes. The season started on a high note with Sport rider Carson Alread taking the checkers to open the season in Duluth, Minn.
Noticeably absent from the Friday night DOMINATOR race was Pro Lite rider Nick Lorenz. A re-aggravated knee injury forced Lorenz to take it easy opening weekend. After further observation, he underwent surgery that ended his season before it started. Making matters worse for the team, a scary landing during practice in Canterbury, Minn., left Alread sidelined for the remainder of the season, too.
But that didn’t stop Judnick from continuing to compete. He signed Canadian standout RJ Roy, along with Pro rider Corin Todd. Roy has proven he can hang with the big boys, landing just short of the podium multiple rounds.
“Our engines are tuned to run on the very edge and placed under extreme demands in extreme weather conditions,” said Judnick. “We’ve been using DOMINATOR since its inception and it has never let us down.”
Not to be forgotten, the chaincases on these sleds also need attention. Judnick uses AMSOIL Synthetic Chaincase & Gear Oil to protect his sleds’ chaincases.
“The chain and sprockets on our race sleds take a beating from the harsh landings and constant changes in snow and track conditions. With just routine maintenance, AMSOIL Synthetic Chaincase & Gear Oil prevents us from having parts failures in these areas,” said Judnick.
ATVs and UTVs aren’t cheap. And neither should be your approach to maintenance if you want your machine to deliver peak performance and last for years.
Fortunately, ATV and UTV maintenance boils down to a handful of relatively simple practices any do-it-yourselfer with basic tools can accomplish.
Here are our top 7 ATV/UTV maintenance tips.
Check/change the oil
Let’s dispense with the obvious: Check your motor oil frequently and change it according to the recommendations in the owner’s manual.
Changing the oil and filter is especially important in ATVs and UTVs used for hard work or aggressive riding.
The added stress we heap on our machines increases heat. And heat causes oils formulated for standard service to lose viscosity (become thinner). Thinner oil than what your engine is designed to use can fail to develop an oil film of adequate thickness or strength to protect against wear.
Extreme heat also invites sludge and performance-robbing deposits. Sludge can clog oil passages and starve the engine of oil, while deposits can cause power loss due to sticking piston rings.
Changing oil is the best defense against engine wear and power loss. Be sure to upgrade to a good synthetic oil, too.
Think of synthetic oil as just another performance upgrade for your machine. You don’t think twice about spending a few hundred dollars on a snowplow or beefier winch. The few extra dollars spent on better oil is nothing by comparison – and it’ll help your machine perform better and last longer.
Change the differential fluid
It’s the same story inside the front and rear differentials.
The extra weight and stress of hard work and performance riding concentrate intense pressure on gears. The lubricant coats the gear teeth during operation, guarding against metal-to-metal contact and wear. The added stress, combined with high heat, can break the fluid film and literally squeeze the lubricant from between the gears, leading to wear.
Change differential fluid according to the recommendations in the owner’s manual. And, like motor oil, upgrade to a good synthetic. It’ll provide improved film strength despite intense pressures to protect gears and bearings in the toughest conditions, helping your machine last for years.
Anyone who’s changed differential fluid knows it can be a hassle: tough-to-reach fill holes, bloody knuckles and gear lube spilled everywhere.
The AMSOIL easy-pack reduces mess, hassle and frustration when changing gear lube. It makes ATV/UTV maintenance much easier, as the video shows.
This is a popular product here in Sioux Falls – Both at the Tea Exit and Stan Houston’s.
Traditionally, enthusiasts use a gear-lube pump in these scenarios. But that’s one more tool to buy. Plus, much of the gear lube is wasted inside the pump and it makes a mess during storage.
Its flexible design allows you to access fill holes in tight spaces and around obstacles that prevent use of the rigid conical bottles common to the gear-lube market.
Check/change air filter
An engine needs three things to run: fuel, spark and air. Most of us forget about air since we don’t have to pay for it.
But a dirty or clogged air filter can choke off airflow and reduce performance or cause the engine to quit completely.
Here’s an analogy to illustrate: Go outside and run around your house. If you’re in decent shape, it shouldn’t be that difficult.
Now, run around your house while breathing through a straw. Restricting airflow into your lungs makes it much more difficult.
The same principle applies inside your engine. A dirty air filter restricts airflow and reduces engine performance. It also allows debris to enter the engine, which can lead to wear.
Check your owner’s manual for recommendations on how often to change the air filter. Check the filter periodically and change it if it’s excessively dirty.
Pro Tip: Ensure the air filter is firmly seated and correctly installed. If not, the engine will ingest dirt, which acts like sandpaper and scours the cylinders, rings and bearings.
Finally, consider using a pre-filter to extend filter life. A pre-filter is essentially a mesh bag that fastens over the air filter. It captures large contaminants and keeps them from lodging in the air filter, extending its life.
Stabilize the fuel
Gas can break down in as little as 30 days. When it does, varnish forms inside the carburetor, which clogs the tiny fuel passages. Eventually, varnish will prevent adequate fuel-flow and keep you machine from starting.
For best performance, add stabilizer to every tank of fuel. If you know you’re going to burn through a tank quickly, like during a day-long ride, you can skip the stabilizer. But many enthusiasts run on the same tank of fuel for months.
Personally, I use my ATV primarily for hauling firewood around my property, meaning it runs in fits and starts. It’s common to use the same tank of fuel for several months.
Stabilizer inhibits oxidization that occurs when fuel sits for long periods. It helps prevent varnish to keep the carburetor clean and the fuel flowing properly.
Pro Tip: Most gasoline contains ethanol, which can corrode carburetor components and damage rubber gaskets and fuel lines. For best performance use 91-octane, ethanol-free gas. If you use 87-octane gas that contains ethanol, treat it with a fuel additive designed to prevent ethanol problems, like AMSOIL Quickshot. – Also kept at Stan Houston’s on W. 121th ST in Sioux Falls.
True, your ATV or UTV is meant to get dirty. But it shouldn’t stay dirty.
Wash off mud and debris, especially after a particularly messy (i.e. fun) ride.
Caked mud and dirt traps moisture, which can hasten rust formation on metal components. It can also pack in around the engine or differentials, which reduces heat-transfer. This causes the temperature to increase, which speeds the rate at which the lubricant oxidizes, or breaks down.
Mud, leaves and other debris packed against the radiator can also cause the engine to run hotter, reducing efficiency.
Take a pressure washer to your machine if you can. Also, consider using an undercoat product that eases cleanup, such as AMSOIL Mudslinger. It provides a protective layer of armor against mud, dirt and snow, making cleanup with a low-pressure garden hose easy.
Pro Tip: After washing, run your machine so engine heat can dry any water that entered the exhaust or the areas around the spark plug boots and coil.
Here’s another easily overlooked ATV/UTV maintenance practice. It doesn’t help that the coolant reservoir is often buried where you can’t readily see it.
Check the coolant level in the radiator. Inspect fluid condition. If it contains sludge or slime, it’s time for a change. Putting it off can result in debris clogging the narrow coolant passages in the engine and preventing optimum cooling. This can lead to the engine overheating. Engine parts expand when they grow hot, which can result in scuffing and wear.
While you’re at it, check the coolant hoses for abrasions or wear. Replace them as needed before they break and leave you stranded.
Spray all rubber parts and things you need waterproofed with AMSOIL Silicone Spray. Kept at Stan Houston’s and our Tea Exit locations.
Inspect tires, CV boots, etc.
Finally, walk around your machine once a month or so and check the following:
Tire pressure and condition
CV boots for cuts or leaks
Brake line condition
Lights
Brake fluid level
This can help you spot any issues before they turn into expensive problems. It’s also a good idea to lubricate any pivot points and linkages with a good spray lubricant, like AMSOIL MP. Doing so is a simple way to ensure your machine operates as designed for the long haul.
All AMSOIL Products mentioned above and more located at Stan Houston’s – 3020 W 12th St, Sioux Falls, SD 57104
A lawnmower that won’t start, especially when taken from storage, is almost always due to one problem: bad gas.
Storing a lawnmower in the fall without adding gasoline stabilizer to the fuel tank can cause the fuel to break down and plug the fuel passages. If fixing that problem doesn’t help, there are a few other common maintenance practices to try, as we explain below.
Here’s what to do when your lawnmower won’t start
Replace the gas
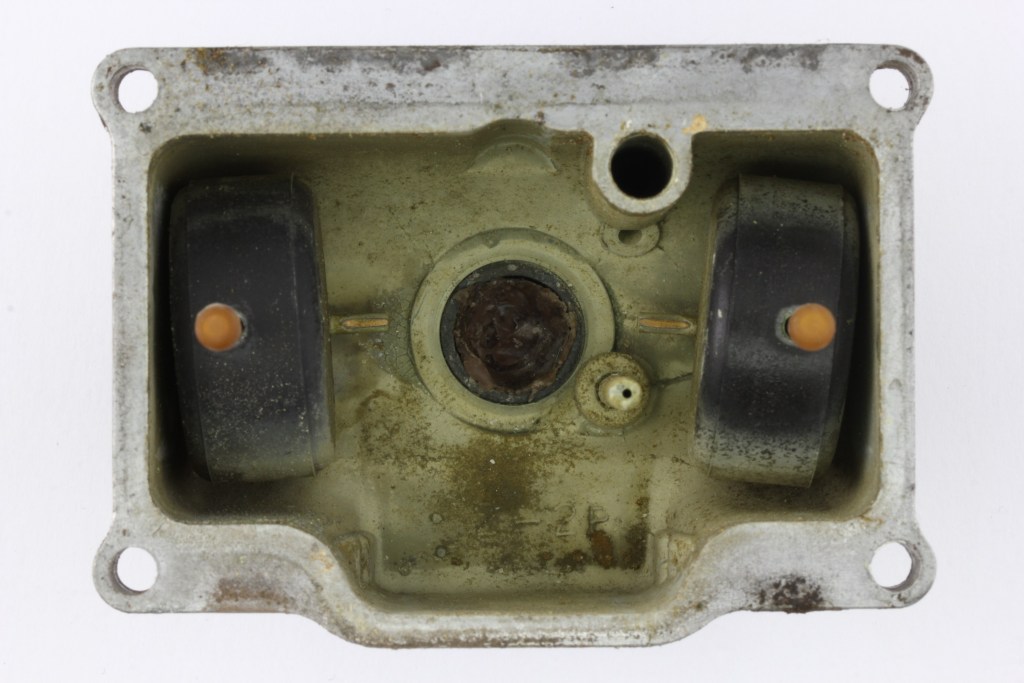
Over time (like the six months your lawnmower sat in your garage over the winter), the lighter hydrocarbons in gas can evaporate. This process creates gums and varnish that dirty the carburetor, plug fuel passages and prevent gas from flowing into the combustion chamber.
The carburetor bowl below formed corrosion and deposits during storage, which can easily plug fuel passages and prevent the engine from starting.
Ethanol-containing gas can absorb water from the atmosphere, which can lead to phase separation, which occurs when ethanol and gas separate, much like oil and water. Ethanol that has absorbed enough moisture and has sat long enough can foul the fuel system and prevent the engine from starting.
No matter how many times you yank the starter cord and pollute the air with your advanced vocabulary, the lawnmower won’t start if it isn’t getting gas.
In extreme cases, evaporation of lighter hydrocarbons can change the gasoline’s composition enough to prevent it from igniting. The gas may be fueling the engine, but it doesn’t matter if it won’t ignite.
If you neglected to add gasoline stabilizer to the fuel prior to storage, empty the tank and replace with fresh gas. If the tank is nearly empty, simply topping off with fresh gas is often enough to get it started.
On some mowers, you can easily remove and empty the fuel tank. Sometimes that’s more trouble than it’s worth. In these cases, use a fluid extraction pump or even a turkey baster. (We keep them in the Sioux Falls location also)
Clean the carburetor
You’ve replaced the fuel, but your lawnmower still won’t start.
Next, try cleaning the carburetor. Remove the air filter and spray carburetor cleaner into the intake. Let it sit for several minutes to help loosen and dissolve varnish and gums.
On some carburetors, you can easily remove the float bowl. If equipped, first remove the small drain plug and drain the gas from the bowl. Remove the float bowl cover and spray the float and narrow fuel passages with carburetor cleaner.
This kind of “quick-and-dirty” carburetor cleaning is usually all it takes to get the gas flowing again and your lawnmower back to cutting grass.
If not, consider removing the carburetor from the engine, disassembling it and giving it a good cleaning. Be forewarned, however: taking apart a carburetor can lead to nothing but frustration for the uninitiated. Take pictures with your phone to aid in reassembly. Note the positions of any linkages or the settings of any mixture screws, if equipped.
If you’re at all reluctant, visit the servicing dealer instead. Also consider replacing the carburetor altogether. It’s a fairly simple process on most smaller mowers and it’s often less expensive than taking it to the dealer.
Clean/replace the air filter
With the air filter removed, now’s the perfect time to clean it. Tap rigid filters on a workbench or the palm of your hand to dislodge grass clippings, leaves and other debris. Direct compressed air from the inside of the filter out to avoid lodging debris deeper into the media.
Use soap and water to wash foam filters. If it’s been a few years, simply replace the filter; they’re inexpensive and mark the only line of defense against wear-causing debris entering your engine and wearing the cylinder and piston rings.
Check the spark plug
A dirty or bad spark plug may also be to blame. Remove the plug and inspect condition. A spark plug in a properly running four-stroke engine should last for years and never appear oily or burned. If so, replace it.
Use a spark-plug tester to check for spark. If you don’t have one, clip the spark-plug boot onto the plug, hold the plug against the metal cylinder head and slowly pull the starter cord. You should see a strong, blue spark. It helps to test the plug in a darkened garage. Replace the plug if you don’t see a spark or it appears weak.
While you’re at it, check the spark-plug gap and set it to the factory specifications noted in the lawnmower owner’s manual.
If you know the plug is good, but you still don’t have spark, the coil likely has failed and requires replacement.
Did you hit a rock or other obstacle?
We’ve all killed a lawnmower engine after hitting a rock or big tree root.
If your lawnmower won’t start in this scenario, you probably sheared the flywheel key. It’s a tiny piece of metal that aligns the flywheel correctly to set the proper engine timing. Hitting an immovable obstacle can immediately stop the mower blade (and crankshaft) while the flywheel keeps spinning, shearing the key.
In this case, the engine timing is off and the mower won’t start until you pull the flywheel and replace the key. It’s an easy enough job IF you have a set of gear pullers lying around the garage. If not, rent a set from a parts store (or buy one…there’s never a bad reason to buy a new tool) or visit the dealer.
My lawnmower starts, but runs poorly
If you finally get the lawnmower started, but it runs like a three-legged dog, try cleaning the carburetor with AMSOIL Power Foam. It’s a potent cleaning agent designed to remove performance-robbing carbon, varnish and other gunk from carburetors and engines.
Add gasoline stabilizer to avoid most of these problems
Which sounds better? Completing all these steps each year when your lawnmower won’t start? Or pouring a little gasoline stabilizer into your fuel tank?
Simply using a good gasoline stabilizer can help avoid most of the problems with a lawnmower that won’t start. AMSOIL Gasoline Stabilizer, for example, keeps fuel fresh up to 12 months. It helps prevent the lighter hydrocarbons from evaporating to reduce gum and varnish and keep the fuel flowing. It also contains corrosion inhibitors for additional protection.
I have a five-gallon gas can in my garage from which I fuel two lawnmowers, two chainsaws, two snowblowers, a string trimmer, an ATV and the occasional brush fire. I treat the fuel with Gasoline Stabilizer every time I fill it so I never have to worry about the gas going bad and causing problems.
You can also use AMSOIL Quickshot. It’s designed primarily to clean carburetors and combustion chambers while addressing problems with ethanol. But it also provides short-term gasoline stabilization of up to six months.
As a young farm kid, before I could operate the tractors, I had to pick rocks and sticks in the fields. I sometimes unearthed boulders that would have broken the blades on the tiller immediately.
I remember thinking, “This can’t be the most efficient way to prepare a farm field – there has to be an easier way.”
One day, I went home and asked, “Don’t they make a Bobcat attachment for this?” My parents replied, “Well, yeah, but then what would you do? Sit at home inside and play video games?”
These days, I’m always looking for the best way to accomplish any task at hand. And, 20 years later, I’m still fascinated by what you can do with skid steer attachments. The process improvements are sensational.
Here is my list of the coolest skid steer attachments
Disclaimer: the following list is for the common person. The added value these attachments provide will differ depending on your line of work (construction, landscaping, farming, etc.).
1. Essential skid steer attachments
Bucket – I’m starting the list with the most affordable and practical attachment, which to me makes it the coolest. With a bucket attachment, I like to say I have access to the best wheelbarrow in the world. I have redone a handful of driveways with solely a skid steer and a bucket attachment. Everyone can use a skid steer bucket in their life. Well, not if you live in a skyscraper apartment.
Forks – These are most often used to move pallets of material or maybe 275-gallon totes of AMSOIL products. Forks are perfect for businesses that don’t quite need a forklift for everyday use. They’re practical for stacking lumber and building materials to be set in a garage.
Be sure to put blocks underneath so you can fit your forks underneath the next time you want to move something. Another reason forks are great? They’re affordable.
2. Brush Hog
Brush cutters are ideal for the initial pass when clearing land and mowing overgrown areas. As a kid (and adult), I used the brush hog to clear my ATV and dirt bike trails since the six-foot swath it cut was the perfect width.
Word to the wise: be careful with your speed and the size of brush. Thick brush can do harm to a brush cutter, requiring a lot of maintenance.
While a tiller attachment isn’t a necessity, it can save you a ton of time and sweat equity. If you’re just tilling a little backyard garden, use a gas rototiller – it’s much more cost effective than renting a skid steer attachment. For large areas or when landscaping, you can’t beat a skid steer with a tiller attachment. Tillers are purpose-built for pulverizing the toughest soil, saving time and money.
4. Auger
Augers are used to drill holes for fencing, footings, trees and more. There are different drive systems for different types of soils. Augers can usually dig down about six feet, but you can buy extensions if need be.
Pro tip: using the hydraulics, give the auger a good shake after it’s pulled from the ground to avoid spraying dirt all over the place (and people) when you fire it up again.
5. Trencher
This one makes the list because of the time savings it offers. There are a variety of trencher options on the market. Before renting or buying, it’s important to know the depth and width of the trench you’re digging. Forty-two inch trencher attachments work well, especially for utility lines, irrigation systems and drain pipes. If you often need a trencher, there may be a better piece of equipment out there for you, like a narrow excavator bucket.
6. Landscape rake
Landscape rakes are used for cutting out soil and gathering sticks and rocks with ease. CAT’s landscape rakes pulverize, aerate and level the soil while collecting rocks and debris in a hopper. There are a few variations in landscaping rakes from the major manufacturers.
7. Sweeper
There are a few different kinds of sweepers available, including…
Pick-up brooms (utility brooms)
Sweeper brooms
Angle brooms
Utility brooms are a personal favorite. They collect dirt, rocks and other debris into a hopper to be dumped in a place of your choosing. Optional dust-control kits help prevent the amount of airborne dust nearby.
My only complaint? They’re a little too big for cleaning the garage.
The following honorable mentions didn’t quite make the main list due to the narrowness of the application or cost effectiveness. But they’re still worth considering for some people.
Bale spear – An absolute necessity on the farm. We used these for round bails the most. Stacking them on a trailer three high takes precision, which this affordable attachment easily provides.
Dozer blade – While practical for small soil movement and leveling, you can usually get by with a bucket.
Grapple buckets – Ever wish your hands were huge, powerful and felt no pain? You were probably wishing for a grapple bucket. This attachment is prefect for grabbing heavy, oddly shaped objects. They’re most often found in the demo, construction and trash-management industries.
Mulcher – Although mulcher attachments are a cool concept, they’re expensive. Mulchers are used on land that hasn’t been touched in a long time. They help reduce manual labor.
I can’t complain about picking rocks all summer in those fields; it shaped who I am. When I have kids, my rock-picking stories might be like my parents’ stories of “walking to school, in the freezing cold, uphill both ways.”