How to Perform Oil Analysis
We keep these kits right here in the Omaha store. Ask for the one with postage or with out for a slight savings. When doing several vehicles use the one w/o postage to send all together.
Used oil analysis is one of the most potent tools in your vehicle-maintenance arsenal. It effectively provides a glimpse inside your engine to gauge lubricant and component condition without so much as removing a bolt or bloodying a knuckle. And it’s simple and inexpensive. Here’s how to perform oil analysis.
What is oil analysis?
First, let’s define our terms.
Oil analysis is the process of chemically analyzing a lubricant sample (typically used motor oil) to determine lubricant and engine or component condition.
You take a sample of the lubricant and ship it to a qualified laboratory. Technicians subject the lubricant to a range of tests to determine the concentration of wear metals, fuel dilution, the lubricant’s total base number (TBN), oxidation and other information. The lab sends you a report that shows lubricant condition and includes a brief explanation and recommendations for future service.
The benefits of oil analysis
Determining the condition of the oil inside your engine offers a number of benefits, all of which save you time, money and hassle in the future.
Maximize oil drain intervals
Monitoring the condition of the oil allows you to optimize drain intervals so you can capitalize on the fluid’s full service life. Performing fewer oil changes minimizes maintenance costs and, for businesses that depend on vehicle availability, maximizes uptime. It also vastly reduces the amount of waste oil you have to truck to the recycling facility, helping the environment.
Extend equipment life
Monitoring system cleanliness and filtration efficiency can help you keep your vehicles and equipment longer and significantly reduce replacement costs.
Prevent major problems
Oil analysis identifies dirt, wear particles, fuel dilution, coolant and other contaminants that can cause catastrophic failure or significantly shorten equipment life. Arming yourself with this information allows you to proactively fix problems before they spiral out of control.
Maximize asset reliability
For businesses that maintain vehicle fleets, testing and analysis ensure that equipment is up, running and making money instead of laid up in the shop.
Increased resale value
Performing oil analysis provides valuable sampling history documentation that can justify higher equipment resale values.
How to perform oil analysis
To demonstrate how easy it is to perform oil analysis, I obtained an oil analysis kit from Oil Analyzers INC. and identified the perfect subject from my family fleet – my trusty 1998 Toyota Corolla. I thumped down exactly $2,995 for the car more than three years ago, and it’s been bulletproof ever since. In fact, it was used in this demonstration of how to test engine compression. Check it out to see how it performed.
Here’s what you’ll need to perform oil analysis on your vehicle
- Oil analysis kit
- Sampling pump with hose
- Gloves
- Rag
1) Warm up the engine
Warm oil flows more easily through the sampling pump. In addition, circulating the oil prior to drawing a sample ensures consistency. Just run the vehicle for a couple minutes; there’s no need to bring it up to operating temperature.
2) Draw the oil sample
Using a vacuum pump is the easiest and cleanest way to accomplish this. It allows access to the oil sump through the dipstick tube. Thread a clean sample bottle to the pump. Attach a length of clean hose to the top of the pump and tighten the lock ring.
PRO TIP: To know how much sampling hose to use, measure the dipstick and add a foot.
Insert the opposite end of the tube into the dipstick tube. It helps to cut it at a 45-degree angle to avoid snagging on bends or restrictions.
Once it bottoms out in the oil sump, retract the tube about an inch so it’s not pulling contaminants off the bottom of the oil pan. Pump the plunger until the bottle is 3/4 full.
Sometimes it’s impossible to draw a lubricant sample through the dipstick tube. In these cases, you can pull the sample straight from the reservoir, although it’s messier. If this is the case, allow the lubricant to drain for a couple seconds before catching a sample in the bottle so contaminants that have settled around the drain plug are flushed out. Quickly reinstall the drain plug and top-off the reservoir.
3) Ship the oil sample
Most oil analysis kits come with the appropriate labels and directions for shipping it to a lab. Follow the instructions, then hang tight until the results arrive.
4) Read the results
I can’t speak for all oil analysis labs, but Oil Analyzers INC. typically returns results in about two days after receiving the sample. I received a PDF in my inbox the day after the lab had received the oil sample.
The lab sends a report that includes application information, elemental analysis and recommendations. The amount of information varies depending on the kit you use.
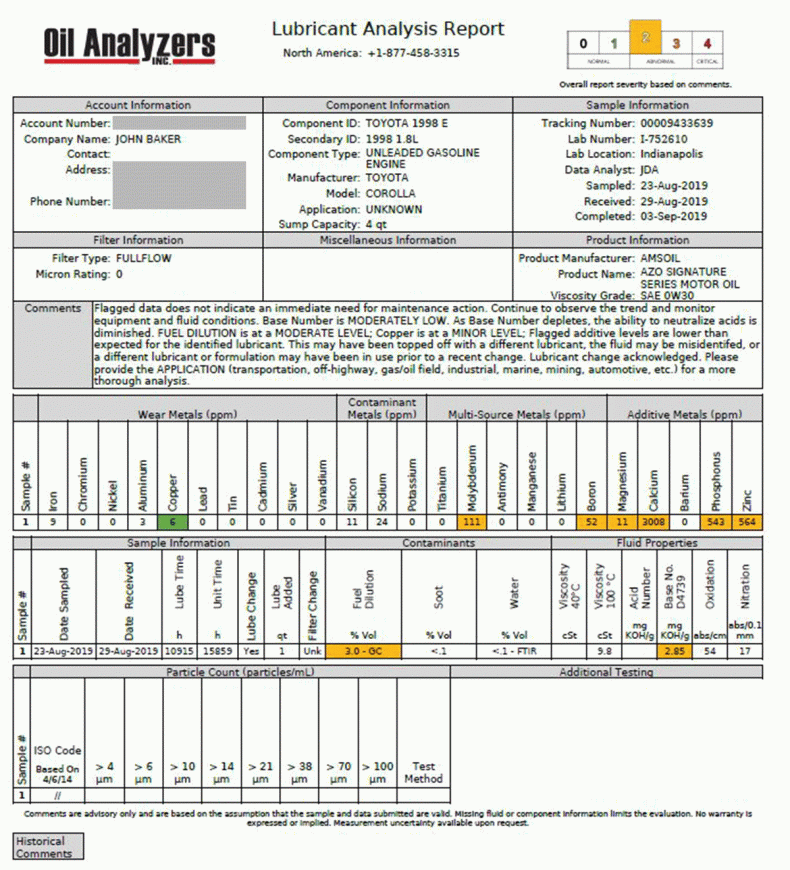
Let’s take a look at the report for my ’98 Corolla.
It’s important to note that I put 10,915 miles on the oil over the course of 11 months. First, notice the severity status level in the upper right. It provides a quick reference to determine the status of the sample.
- Severity 0 (Normal) = Oil is suitable for continued use.
- Severity 1 (Normal) = Oil is suitable for continued use. Observe for trends in future tests.
- Severity 2 (Abnormal) = Oil is suitable for continued use. Resample at half the normal interval.
- Severity 3 (Abnormal) = Replace oil filter and top-off system with fresh oil. Resample at half the normal interval or change oil.
- Severity 4 (Critical) = Change oil and filter if not done when sample was taken.
My sample fell into the Severity 2 category. Why?
Notice the Multi-Source Metals and Additive Metals highlighted in yellow.
The information in the Comments section explains why: “Flagged additive levels are lower than expected for the identified lubricant. This may have been topped off with a different lubricant, the fluid may be misidentified, or a different lubricant or formulation may have been in use prior to a recent change.”
Nailed it.
I’m guilty of having topped-off the engine with a different AMSOIL product than the Signature Series 0W-30 Synthetic Motor Oil initially used for the oil change 11 months earlier. This report shows why you shouldn’t mix lubricants, if possible. Sure, it won’t do lasting harm to the engine, but mixing lubricants disrupts the oil’s chemistry and can shorten its service life and reduce performance.
Learn from my negligence, friends – don’t mix engine oils.
Reading an oil analysis report
You can also see fuel dilution is moderately high while TBN is moderately low. As Allen Bender, Oil Analyzers INC. Manager told me, the TBN is no cause for concern and there is “considerable time” before the oil would have to be changed.
All in all, this is a good report for a 21-year-old engine with more than 150,000 miles, most of it using who-knows-what motor oil.
Wear metals are low, meaning the oil is doing a great job protecting the bearings and other components from wear. Contaminants are also low, meaning the air filter is capturing silicon and other debris before it reaches the engine. The report shows no glycol contamination, which means the engine coolant is where it’s supposed to be – in the cooling system – and not in the oil via a leaking head gasket or other issue. And oil viscosity and oxidation are both good, showing that the oil is holding up fine, even after 11 months.
The one area that provides a little concern is 3-percent fuel dilution. As noted, this is a moderate level and shouldn’t cause alarm, but it is something to watch.
This is a perfect example of the power of oil analysis. It allows me to monitor the fuel-dilution level and potentially take action if it increases to a problematic level. Knowing the engine suffers moderate fuel dilution also reinforces the importance of using a high-quality synthetic oil (and not mixing oils!) to ensure maximum protection.
Give oil analysis a try. It’s relatively cheap for the information it provides and it empowers you to take better care of your vehicles while maximizing their return on your investment.
We have all the main oil analysis kits here in the Sioux Falls store. 47073 98th st. Just behind Marlins found at Exit 73 on I-29.
605-274-2580