5 Expert Chainsaw Tips to Keep Things In Check

5 Expert Chainsaw Maintenance Tips

Chainsaws are great tools – when they’re working properly. Here are five chainsaw-maintenance tips to keep your chainsaw cutting strong.

Keep the chain sharp

Anyone who has tried forcing a dull chain through wood knows the importance of a sharp chain.

Properly sharpening a chain is an art form, so if you don’t want a collection of useless chains hanging on your garage wall, visit a professional.

It’ll likely cost you less than $10 and save you a ton of grief.

Oh, and the AMSOIL Bar & Chain oil keeps the chain cooler thus sharper longer. (We keep both gallons and quarts in Sioux Falls)

filing chain saw teeth

However, if you’re like me and enjoy the challenge of learning a new craft, be sure to…

  • Use the proper file size. The box the chain came in or your owner’s manual are two places to find that information.
  • File at the correct angle. You can purchase a file gauge at most home centers that ensures you hold the file correctly.
  • File each tooth the same number of file strokes (typically 3-6).
  • Be careful with the depth gauges (the protrusions directly in front of each tooth). If you file them too much, the saw can bite too deeply into the wood and stall or, worse, pull you off balance. Again, use a gauge to ensure you sharpen the depth gauges correctly.
video
play-sharp-fill


Properly tension the chain

A chain that’s too tight can bind and stall the saw. On a non-roller-tip bar, an over-tightened chain can overheat.

When adjusting the chain, hold the tip of the bar up as far as it goes and tighten the tensioning screw until you’ve taken the slack out of the underside of the bar.

soaking chain in oil before use

Soak a new chain in bar and chain oil when breaking it in.

Break in a new chain

When it’s time to replace the chain, break it in first by soaking it in bar and chain oil for a couple hours. This ensures all the pivot points are well lubricated.

Then, hang the chain from a nail and let the excess oil drip back into the pan.

Install and tension the chain and run until warm.

The chain will loosen as it heats, so shut the saw down and tension the chain again.

Then, perform light-duty work, like cutting limbs and small branches for 30 minutes or so. Tension the chain again, and you’re ready to dive into the heavy-duty work.

Find out why Soderlund’s Wood Mill using only AMSOIL.

Clean the air filter

Keeping the air filter clean is one of the most important parts of chainsaw maintenance to extend saw life and increase performance.

It’s the only line of defense against the engine ingesting sawdust and dirt, which can plug the carburetor and cause the saw to start hard and run poorly. Contaminants can also wreck the piston rings, causing the engine to lose compression, reducing power.

Many saws have a screen as opposed to a foam or paper filter. In these cases, use an air compressor to direct air through the filter backward to prevent lodging debris deeper into the media.

If you don’t have an air compressor, tap the filter on the edge of a workbench. If you have a foam or paper filter, replace it often – it’s far less expensive than replacing the entire saw.

Find out why different chainsaws have different oil mix ratios.

Use fresh gasoline for best chainsaw maintenance

Most homeowners’ chainsaws spend far more time sitting in the garage than cutting in the woods.

As gas/oil ages, gasoline can breakdown in as few as 30 days, creating gums and varnish that plug the carburetor and lead to hard starts and rough running.

Mix only enough fuel to last 30 days. Better still, use a two-stoke oil formulated with a gasoline stabilizer, such as AMSOIL SABER® Professional Synthetic 2-Stroke Oil.

Not only is SABER Professional formulated with stabilizer, it also fights carbon to keep the exhaust port and spark-arrestor screen (if equipped) clean for maximum engine operability and power. Using a premium two-stroke oil is an overlooked, but vital, part of chainsaw maintenance.

You can also treat fuel with an additive designed to stabilize fuel, like AMSOIL Quickshot®. Both products keep gas fresh up to six months.

Lawnmower Won’t Start? Do this.

Lawnmower Won’t Start? Do this.

A lawnmower that won’t start, especially when taken from storage, is almost always due to one problem: bad gas.

Storing a lawnmower in the fall without adding gasoline stabilizer to the fuel tank can cause the fuel to break down and plug the fuel passages. If fixing that problem doesn’t help, there are a few other common maintenance practices to try, as we explain below.

Here’s what to do when your lawnmower won’t start

Replace the gas

Over time (like the six months your lawnmower sat in your garage over the winter), the lighter hydrocarbons in gas can evaporate. This process creates gums and varnish that dirty the carburetor, plug fuel passages and prevent gas from flowing into the combustion chamber.

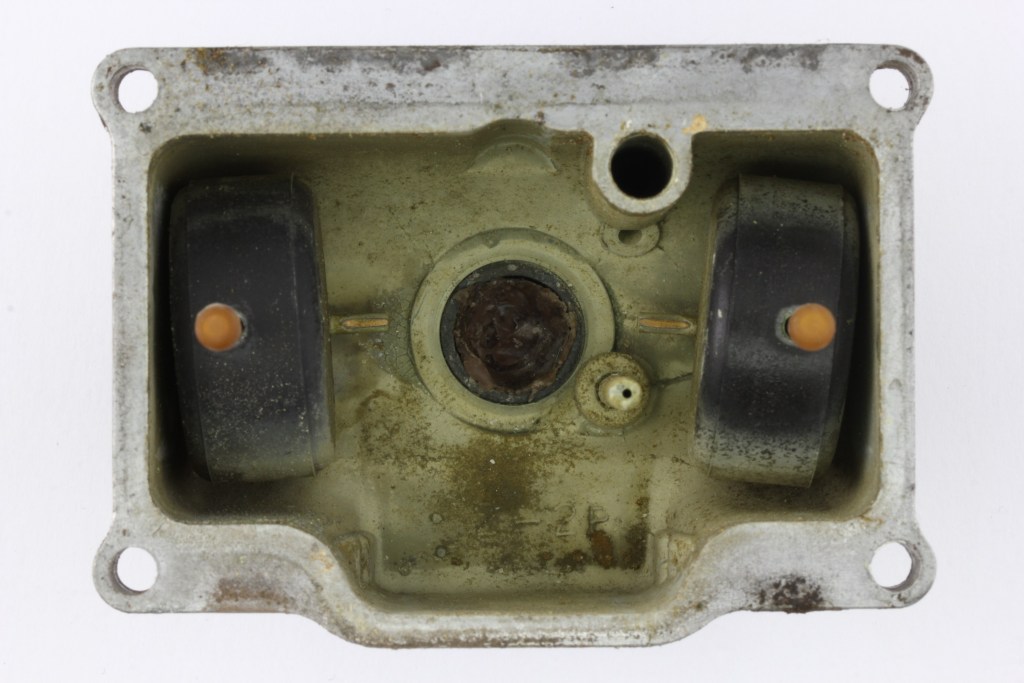
The carburetor bowl below formed corrosion and deposits during storage, which can easily plug fuel passages and prevent the engine from starting.

Deposits and residue in carburetor bowl

Deposits and residue in carburetor bowl

Ethanol-containing gas can absorb water from the atmosphere, which can lead to phase separation, which occurs when ethanol and gas separate, much like oil and water. Ethanol that has absorbed enough moisture and has sat long enough can foul the fuel system and prevent the engine from starting.

No matter how many times you yank the starter cord and pollute the air with your advanced vocabulary, the lawnmower won’t start if it isn’t getting gas.

In extreme cases, evaporation of lighter hydrocarbons can change the gasoline’s composition enough to prevent it from igniting. The gas may be fueling the engine, but it doesn’t matter if it won’t ignite.

If you neglected to add gasoline stabilizer to the fuel prior to storage, empty the tank and replace with fresh gas. If the tank is nearly empty, simply topping off with fresh gas is often enough to get it started.

On some mowers, you can easily remove and empty the fuel tank. Sometimes that’s more trouble than it’s worth. In these cases, use a fluid extraction pump or even a turkey baster. (We keep them in the Sioux Falls location also)

Clean the carburetor

You’ve replaced the fuel, but your lawnmower still won’t start.

Next, try cleaning the carburetor. Remove the air filter and spray carburetor cleaner into the intake. Let it sit for several minutes to help loosen and dissolve varnish and gums.

On some carburetors, you can easily remove the float bowl. If equipped, first remove the small drain plug and drain the gas from the bowl. Remove the float bowl cover and spray the float and narrow fuel passages with carburetor cleaner.

This kind of “quick-and-dirty” carburetor cleaning is usually all it takes to get the gas flowing again and your lawnmower back to cutting grass.

If not, consider removing the carburetor from the engine, disassembling it and giving it a good cleaning. Be forewarned, however: taking apart a carburetor can lead to nothing but frustration for the uninitiated. Take pictures with your phone to aid in reassembly. Note the positions of any linkages or the settings of any mixture screws, if equipped.

If you’re at all reluctant, visit the servicing dealer instead. Also consider replacing the carburetor altogether. It’s a fairly simple process on most smaller mowers and it’s often less expensive than taking it to the dealer.

Clean/replace the air filter

With the air filter removed, now’s the perfect time to clean it. Tap rigid filters on a workbench or the palm of your hand to dislodge grass clippings, leaves and other debris. Direct compressed air from the inside of the filter out to avoid lodging debris deeper into the media.

Use soap and water to wash foam filters. If it’s been a few years, simply replace the filter; they’re inexpensive and mark the only line of defense against wear-causing debris entering your engine and wearing the cylinder and piston rings.

Check the spark plug

A dirty or bad spark plug may also be to blame. Remove the plug and inspect condition. A spark plug in a properly running four-stroke engine should last for years and never appear oily or burned. If so, replace it.

Use a spark-plug tester to check for spark. If you don’t have one, clip the spark-plug boot onto the plug, hold the plug against the metal cylinder head and slowly pull the starter cord. You should see a strong, blue spark. It helps to test the plug in a darkened garage. Replace the plug if you don’t see a spark or it appears weak.

While you’re at it, check the spark-plug gap and set it to the factory specifications noted in the lawnmower owner’s manual.

If you know the plug is good, but you still don’t have spark, the coil likely has failed and requires replacement.

Did you hit a rock or other obstacle?

We’ve all killed a lawnmower engine after hitting a rock or big tree root.

If your lawnmower won’t start in this scenario, you probably sheared the flywheel key. It’s a tiny piece of metal that aligns the flywheel correctly to set the proper engine timing. Hitting an immovable obstacle can immediately stop the mower blade (and crankshaft) while the flywheel keeps spinning, shearing the key.

In this case, the engine timing is off and the mower won’t start until you pull the flywheel and replace the key. It’s an easy enough job IF you have a set of gear pullers lying around the garage. If not, rent a set from a parts store (or buy one…there’s never a bad reason to buy a new tool) or visit the dealer.

My lawnmower starts, but runs poorly

If you finally get the lawnmower started, but it runs like a three-legged dog, try cleaning the carburetor with AMSOIL Power Foam. It’s a potent cleaning agent designed to remove performance-robbing carbon, varnish and other gunk from carburetors and engines.

Power Foam®

Buy AMSOIL Power Foam

Add gasoline stabilizer to avoid most of these problems

Which sounds better? Completing all these steps each year when your lawnmower won’t start? Or pouring a little gasoline stabilizer into your fuel tank?

Simply using a good gasoline stabilizer can help avoid most of the problems with a lawnmower that won’t start. AMSOIL Gasoline Stabilizer, for example, keeps fuel fresh up to 12 months. It helps prevent the lighter hydrocarbons from evaporating to reduce gum and varnish and keep the fuel flowing. It also contains corrosion inhibitors for additional protection.

Gasoline Stabilizer

Buy AMSOIL Gasoline Stabilizer

I have a five-gallon gas can in my garage from which I fuel two lawnmowers, two chainsaws, two snowblowers, a string trimmer, an ATV and the occasional brush fire. I treat the fuel with Gasoline Stabilizer every time I fill it so I never have to worry about the gas going bad and causing problems.

You can also use AMSOIL Quickshot. It’s designed primarily to clean carburetors and combustion chambers while addressing problems with ethanol. But it also provides short-term gasoline stabilization of up to six months.

Weed Eater Won’t Start? Try This

We’ve all been there – Weed Eater Starting Foes!

No matter what you call it – weed eater, weed whacker, string trimmer – chances are at some point it won’t start. Few things are more annoying than destroying your shoulder trying to start the weed eater when there’s work to do.

Fortunately, gasoline weed-eater engines are pretty simple, so most DIYers with a few tools and some basic know-how can get a stubborn trimmer running.

Here are our guidelines for troubleshooting a weed eater that won’t start

1) Check the gasoline

Gasoline can break down in as little as 30 days, especially today’s ethanol-containing gas. Homeowners sometimes stash their string trimmer in the garage at season’s end without stabilizing the gas. Oxygen has all winter to break down and ruin the gasoline, leaving you with a trimmer that won’t start in the spring.

If your trimmer falls into this category, empty the old gas from the fuel tank and replace it with fresh fuel.

2) Clean the carburetor

Once gas breaks down, varnish, gums and other debris can form inside the carburetor and clog the tiny fuel passages. This prevents fuel from reaching the combustion chamber and igniting.

Remove the air filter and spray carburetor cleaner into the intake. Let it sit for several minutes to help loosen and dissolve varnish. Replace the filter and try starting the trimmer.

If this doesn’t solve the problem, consider disassembling the carburetor to give it a more thorough cleaning.

Beware, however – taking apart a carburetor marks a point-of-no-return, of sorts. Understanding how the delicate gaskets, tiny screws and needle valves go back together can be a challenge, even on a relatively simple string-trimmer carburetor. Take pictures with your phone throughout the process to help reassembly. Clean all the openings and passages with carburetor cleaner.

If you’re reluctant to take apart the carb, visit the servicing dealer.

3) Clean or replace the spark plug

Oil deposits and carbon can foul the spark plug in a two-stroke engine if a low-quality oil is used. Deposits on the electrode prevent the plug from firing properly, which can reduce performance or prevent the engine from running altogether.

Plugs are inexpensive, so replace it if it’s fouled. If you don’t have a new plug available, clean the deposits from the electrode with light-duty sandpaper and check the gap. Consult the owner’s manual for the correct gap size.

If you know the spark plug is good, but the engine still doesn’t produce spark, the coil is likely to blame and requires replacement.

4) Clean or replace the air filter

A clogged air filter prevents the engine from receiving sufficient air to operate properly.

Before removing the air filter, brush away loose debris from around the filter cover and filter element. Tap rigid filters on a tabletop or the palm of your hand to dislodge any dirt or debris. Compressed air also works well. Make sure you direct air through the filter from the inside to avoid lodging debris deeper in the filter.

Avoid washing paper filters as this can collapse their micro-fine structure. Foam filters, however, can easily be washed using mild detergent and warm water.

As with the spark plug, however, replacement is often the best practice, especially if the filter is excessively dirty.

5) Clean the spark-arrestor screen

On many trimmers, a small screen covers the exhaust outlet and prevents sparks from exiting the muffler and potentially starting a fire.

As with plug fouling, too much oil in the gasoline, inferior oil and continued low-rpm operation can plug the screen with carbon deposits. This prevents exhaust-gas flow, which leads to power loss. In extreme cases, heavy deposits choke airflow enough to leave you with a weed eater that won’t start.

To fix the problem, remove the spark arrestor screen and spray it with a heavy-duty cleaner, like AMSOIL Power Foam®, to soften the deposits before cleaning the screen with an abrasive pad. Reinstall the screen and test the trimmer.

Replace the screen altogether if it’s excessively plugged with carbon.

6) Switch to a better two-stroke oil

Low-quality oil that leads to heavy carbon is often to blame for most of the problems on this list.

Using a good two-stroke oil that burns cleanly and helps prevent carbon deposits is one of the easiest maintenance practices you can perform to ensure your trimmer starts easily, runs well and last for years.

Buy SABER Professional

AMSOIL SABER Professional Synthetic 2-Stroke Oil withstands high heat to fight carbon in gasoline string trimmers and other two-stroke equipment. It’s tested and proven at any mix ratio up to 100:1, offering the convenience of one mix ratio for all your equipment. Plus, it’s formulated with gasoline stabilizer to help keep fuel fresh during short-term storage.

The images here show AMSOIL SABER Professional’s superior cleanliness properties. It’s just one reason professional landscapers, like Duluth Lawn Care, only trust AMSOIL products.

2-cycle mix ratios

AMSOIL SABER Professional mixed at 100:1 delivers better protection against power-robbing deposits than other oils mixed at 50:1.

View the complete test results here.

Follow the guidelines on this list to get your string trimmer back up and running…and to give your shoulder a break.