Save Every Drop of Horsepower with UPPER CYLINDER LUBRICANT

AMSOIL UPPER CYLINDER LUBRICANT:  I use it and it works!

Now on the market for about a year: AMSOIL Upper Cylinder Lubricant (UCL) is the latest addition to the gasoline additive lineup. It delivers more lubricity than the competition and battles ethanol-related corrosion.

Fuel Additive Product Overview

Upper cylinders are one of the toughest areas of an engine to lubricate due to the intense heat of combustion and the design of today’s vehicles. New AMSOIL Upper Cylinder Lubricant delivers a much-needed layer of protection to this trouble area to help fight piston-ring and cylinder wear, maximizing engine compression and horsepower. Its lubricity improvers aid in protecting fuel injectors and other fuel-system components from wear, helping ensure excellent performance and long life.

Plus, it really works. AMSOIL Upper Cylinder Lubricant delivers 18 percent more lubricity than Lucas* and 20 percent more than Sea Foam* for better retention of horsepower and fuel economy. ¹

Inhibits Corrosion

Upper Cylinder Lubricant uses potent corrosion inhibitors to coat metal surfaces, block out moisture and stop deterioration before it starts. This is particularly important when using gasoline that contains ethanol due to its propensity to attract water and hasten corrosion. Inhibiting corrosion maximizes component life and reduces wear in the engine’s top-end to guard against compression loss and maintain optimum power.

Keeps Injectors Clean

Upper Cylinder Lubricant contains detergent additives designed to maintain injector cleanliness. It’s designed to work in concert with AMSOIL P.i. Performance Improver (API) to maintain injector and combustion-chamber cleanliness, retain fuel-economy and performance gains and maximize component life.

Capless-Compatible Packaging

The AMSOIL Upper Cylinder Lubricant bottle is fully compatible with capless fuel systems. Many new vehicles have replaced traditional fuel caps with capless systems. The threads on most bottles restrict them from opening the flap inside the fuel neck and also make removing the bottle difficult. Our packaging makes it easy to insert, pour and remove the bottle.


¹ Based on independent testing of AMSOIL Upper Cylinder Lubricant, Lucas Upper Cylinder Lubricant and Sea Foam Motor Treatment obtained on 02/13/2019 using the ASTM D6079 modified for use with gasoline.

User Comments:

I’ve been using this for almost a year now.  In my Ford Focus which is the 2.0 non-turbo I can now use 10% ethanol and get over 40 MPG! I drive from Sioux Falls to Omaha and back often so I can see a difference. It seems the only logical reason this happens is the better lubricity in the head and cylinder ring area. There must be a good amount of friction there. And the parts of the lubricant perhaps seal the rings and valves better as well as the valve stem.

As soon as I get 1000 miles on my Corvair (new engine and heads) I’ll try this as there is even greater friction on horizontal cylinders. It seems to sort of work like lead once did.

If you are going on a long trip keep this in the tank for maximum efficiency. The upper cylinder areas need lubrication. Adding this to the fuel relieves more stress from the engine thus better long term efficiency.

The best way to buy is by the case reducing the price low enough to only cost pennies per tank of gasoline.  Thus we keep several cases in stock for your use.

Find out more about this newer AMSOIL product Upper Cyl Lube!

Small engine won’t start? Identifying the Cause.

Small engine won’t start?

Bad gas is the number-one reason, and here’s how to prevent it.

Len Groom | TECHNICAL PRODUCT MANAGER, POWERSPORTS

In northern Minnesota, where I live, the temperature occasionally breaks 80ºF (27ºC) in the summer. When it does, it’s time to fire up my Jet-Skis* and hit the lake. The last thing I want to do on a sunny summer day is mess around with equipment that refuses to start or run properly.

Bad gasoline is the number-one reason seasonal equipment starts hard or runs rough. Over time, gasoline changes, leaving behind gums, varnish and other solids that foul the fuel system and prevent gas from flowing into the combustion chamber. In severe cases, gasoline can change so dramatically that it no longer ignites.

Gasoline is predominantly a mixture of carbon and hydrogen atoms bonded together into energy-dense hydrocarbons. Like conventional base oils, it’s derived from crude oil via a distillation process that uses heat, pressure and other catalysts to create different fractions. Gasoline is comprised of hydrocarbons that are lighter than those found in, for example, diesel fuel or conventional base oils. Refiners add ethanol to the formulation, typically 10 percent, but as high as 85 percent.

Time Takes Its Toll – You Must Treat Gasoline

Time, however, takes its toll on gasoline. Exposure to heat, humidity, atmospheric pressure, oxygen and other variables degrade fuel.

In addition to gums and varnish becoming more concentrated and less soluble as lighter hydrocarbons evaporate, gas is continually oxidizing, which further contributes to varnish and other gunk. Gasoline oxidizes more quickly than motor oil and its negative effects are more immediately noticeable. That’s why it’s important to use high quality gas and store it in approved containers where air infiltration is limited, like inside a ventilated garage or shed, and not in the back of your truck or under the deck.

Meanwhile, ethanol added to gasoline at the refinery can absorb water from the atmosphere, which can lead to phase separation, which occurs when ethanol and gas separate, much like oil and water. Ethanol that has absorbed enough moisture and has sat long enough can foul the fuel system and prevent the engine from starting.

AMSOIL Fights Corrosion

AMSOIL provides corrosion protection Sea Foam® Motor Treatment can’t match, helping maintain power and performance and keeping metal looking like new even when subjected to salt water.  ?

? Based upon independent testing of AMSOIL Gasoline
Stabilizer obtained Nov. 8, 2018 and Sea Foam Motor
Treatment purchased Oct. 25, 2018 in a modified NACE
TM0172 using synthetic sea water per ASTM D665 part B.

This all sounds dire, but it’s nothing treating your gasoline with AMSOIL Gasoline Stabilizer (AST) can’t solve. Gasoline Stabilizer keeps fuel fresh up to 12 months. AMSOIL Quickshot® (AQS) stabilizes gasoline during short-term storage up to six months, in addition to providing potent cleaning benefits and protection against ethanol issues.

What does stabilizer do?

That explanation may suit some people, but this is Tech Talk, so let’s look at the chemistry behind gasoline stabilizers.

You’ve probably heard terms like “free radicals” and “antioxidants” in relation to your health. A free radical is an unpaired electron, and most are unstable and highly reactive. They can either donate an electron to, or accept an electron from, other molecules. This starts a chain reaction that can lead to oxidative stress and cell damage. Left unchecked, free radicals can lead to health problems, like cardiovascular disease and cancer. To help fight free radicals, we should eat plenty of foods rich in antioxidants, which lessen their effects. Antioxidants can “donate” an electron to free radicals or trap them, effectively reducing their instability without becoming unstable themselves. Antioxidants aren’t silver bullets, but they go a long way toward improving our health.

By analogy, gasoline stabilizer is an antioxidant for your gasoline. It disrupts the free-radical-induced chain reaction that causes gas to oxidize and form varnish and gums. Some stabilizer products, like Quickshot, also contain chemistry that increases solvency and breaks down existing varnish, helping clean a dirty carburetor and restore performance. As shown, Gasoline Stabilizer also fights corrosion better than Sea Foam Motor Treatment.

Neglecting to stabilize your gas can lead to all sorts of headaches when it’s time to remove your lawnmower, generator, string trimmer or Jet-Ski from storage. For best results, stabilize your gasoline all year long. That’ll ensure your equipment is ready to roll when you are.

Steps To Maintain Your Snowblower – Things to Know

Never Overlook This When Maintaining Your Snowblower

Thanksgiving day, 2016. While my family was gathered in my dining room, imbibing spirits and making merry, I was in the shed disassembling the carburetor on my snowblower, reeking of petroleum as rivers of gasoline flowed under my jacket cuffs and saturated me to the elbows.

Here’s what happened, and here’s how to avoid it.

Snowblower maintenance can be distilled to this Golden Rule: Maintain your fuel system.

I’ll say it again: Maintain your fuel system.

A snowblower that won’t start is almost always due to a fuel problem. And nothing raises your blood pressure like a dead snowblower following the season’s first snowstorm. You know it! We always wait to the last minute on that first snow.

Preventing fuel-system problems starts in the spring prior to storage.

Leave the carburetor full of gas

This is where everything unraveled for me. One theory says that shutting off the fuel line and running the engine until the carburetor empties helps prevent varnish that plugs the jets and prevents starting.

Wrong, at least in my case. As I discovered, leaving the carburetor empty and exposed to air hastens oxidation and varnish. Fluctuating temperatures and humidity throughout the summer invite varnish, and it doesn’t take much to plug the tiny orifices in a carburetor. Then, it’s just a matter of time before you’re stinking of gasoline on Thanksgiving day while blasting carb cleaner on everything within reach.

Instead, add fuel stabilizer at the end of the season, run the engine for a few minutes to distribute the treated gas throughout the system, then shut down the engine. Now you can shut off the fuel line for the summer. The treated fuel in the carburetor bowl provides protection and helps keep components clean.

Some people claim you should run the carburetor empty since the gas will evaporate anyway. That may be true, but evaporation takes time, and the carburetor will at least be protected in the interim.

Stabilize the gas

As mentioned, treat gas with stabilizer prior to storage. Stabilized fuel protects against oxidation and varnish throughout the summer.

Use ethanol-free gas

When water infiltrates your gas tank in the form of melted snow, it can cause phase separation, a phenomenon that occurs when the bond between ethanol (present in most gasoline sold today) and gasoline breaks. When this ethanol/water mixture enters the combustion chamber, it creates a lean-burn situation that can damage your engine.

For best performance, use 91-octane, non-oxygenated (ethanol-free) gas. Many gas stations offer non-oxygenated gas and advertise it for powersports and off-road use. It’s a little more expensive, but spending a few extra dollars a winter to help your $1,000 dollar machine run strong isn’t a factor, in my opinion. At the very least, use ethanol-free gas during storage to help ward off phase separation.

Perhaps test your gas to see if it is really and truly ethanol free. I know many who say “I never use ethanol” and after testing the source gasoline it turned out to be laced with ethanol! Put your gas in a glass jar and see if you see it separate over time. Sometime you need to shake it up.

(Find out how to fight ethanol problems in small engines.)

If you use ethanol-blended gas, consider continuous use of a fuel additive, such as AMSOIL Quickshot, formulated to address ethanol-related performance issues.

Change The Oil in the Spring

Used oil contains acids that can slowly corrode metal components. Prior to storage, change the oil to remove acidic byproducts and ensure maximum protection throughout the summer. After changing oil, I like to run the engine for a couple minutes to distribute oil throughout the lower end of the engine.

Fog the engine

Use fogging oil to protect the upper end (cylinder, piston, valves) from corrosion during storage. Remove the spark plug, which provides the perfect time to inspect its condition, and spray a little oil into the cylinder. Slowly pull the starter cord a few times to distribute the oil, then replace the plug.

Check the gear housing – It can fail!

Clean any debris from around the filler port on the auger gear housing, remove the plug and ensure the gear lube level is up to the top. If not, add the correct lubricant (check your owner’s manual for viscosity).

Inspect belt condition and linkages

Stressing a worn belt after it’s sat idle for months is a recipe for a breakdown. When a belt does break, it’s often while clearing the first big snowfall of the year. Spring is the prime time to check the condition of drive belts and linkages. It’s much easier and far more comfortable to crawl around your snowblower on a mild, spring day than in the winter.

One final word of advice: Keep an eye on the weather at the start of winter. When the forecast calls for the first snowstorm of the season, start your snowblower a few days early to ensure it’s ready to go.

That gives you plenty of time if your snowblower won’t start – like about two hours on Thanksgiving day – to fix any problems.

Lawnmower Won’t Start? Do this.

Lawnmower Won’t Start? Do this.

A lawnmower that won’t start, especially when taken from storage, is almost always due to one problem: bad gas.

Storing a lawnmower in the fall without adding gasoline stabilizer to the fuel tank can cause the fuel to break down and plug the fuel passages. If fixing that problem doesn’t help, there are a few other common maintenance practices to try, as we explain below.

Here’s what to do when your lawnmower won’t start

Replace the gas

Over time (like the six months your lawnmower sat in your garage over the winter), the lighter hydrocarbons in gas can evaporate. This process creates gums and varnish that dirty the carburetor, plug fuel passages and prevent gas from flowing into the combustion chamber.

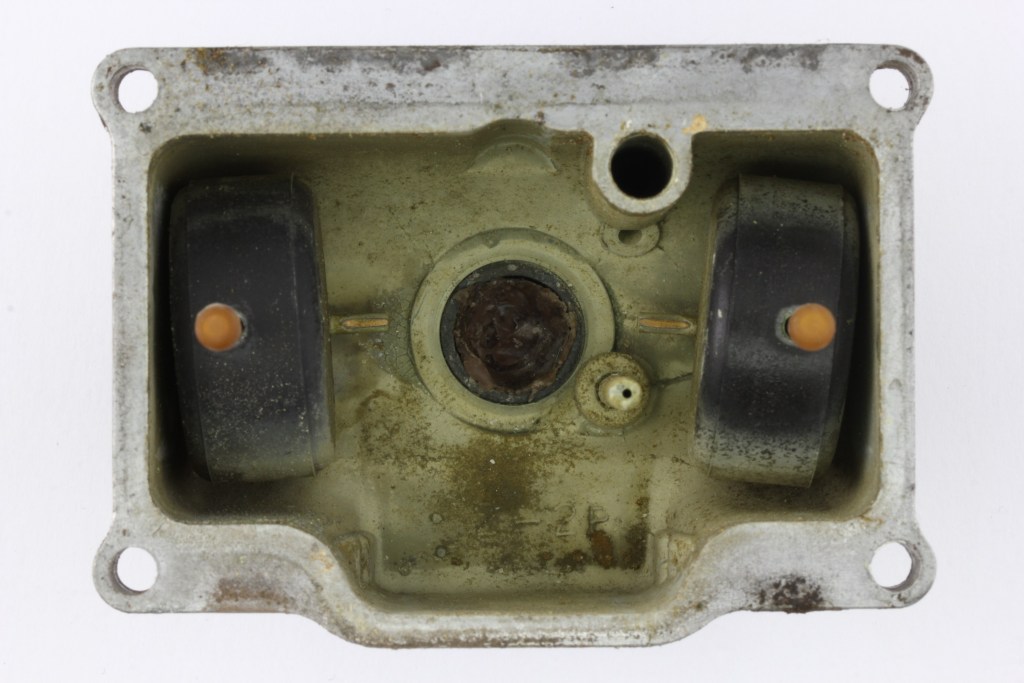
The carburetor bowl below formed corrosion and deposits during storage, which can easily plug fuel passages and prevent the engine from starting.

Deposits and residue in carburetor bowl

Deposits and residue in carburetor bowl

Ethanol-containing gas can absorb water from the atmosphere, which can lead to phase separation, which occurs when ethanol and gas separate, much like oil and water. Ethanol that has absorbed enough moisture and has sat long enough can foul the fuel system and prevent the engine from starting.

No matter how many times you yank the starter cord and pollute the air with your advanced vocabulary, the lawnmower won’t start if it isn’t getting gas.

In extreme cases, evaporation of lighter hydrocarbons can change the gasoline’s composition enough to prevent it from igniting. The gas may be fueling the engine, but it doesn’t matter if it won’t ignite.

If you neglected to add gasoline stabilizer to the fuel prior to storage, empty the tank and replace with fresh gas. If the tank is nearly empty, simply topping off with fresh gas is often enough to get it started.

On some mowers, you can easily remove and empty the fuel tank. Sometimes that’s more trouble than it’s worth. In these cases, use a fluid extraction pump or even a turkey baster. (We keep them in the Sioux Falls location also)

Clean the carburetor

You’ve replaced the fuel, but your lawnmower still won’t start.

Next, try cleaning the carburetor. Remove the air filter and spray carburetor cleaner into the intake. Let it sit for several minutes to help loosen and dissolve varnish and gums.

On some carburetors, you can easily remove the float bowl. If equipped, first remove the small drain plug and drain the gas from the bowl. Remove the float bowl cover and spray the float and narrow fuel passages with carburetor cleaner.

This kind of “quick-and-dirty” carburetor cleaning is usually all it takes to get the gas flowing again and your lawnmower back to cutting grass.

If not, consider removing the carburetor from the engine, disassembling it and giving it a good cleaning. Be forewarned, however: taking apart a carburetor can lead to nothing but frustration for the uninitiated. Take pictures with your phone to aid in reassembly. Note the positions of any linkages or the settings of any mixture screws, if equipped.

If you’re at all reluctant, visit the servicing dealer instead. Also consider replacing the carburetor altogether. It’s a fairly simple process on most smaller mowers and it’s often less expensive than taking it to the dealer.

Clean/replace the air filter

With the air filter removed, now’s the perfect time to clean it. Tap rigid filters on a workbench or the palm of your hand to dislodge grass clippings, leaves and other debris. Direct compressed air from the inside of the filter out to avoid lodging debris deeper into the media.

Use soap and water to wash foam filters. If it’s been a few years, simply replace the filter; they’re inexpensive and mark the only line of defense against wear-causing debris entering your engine and wearing the cylinder and piston rings.

Check the spark plug

A dirty or bad spark plug may also be to blame. Remove the plug and inspect condition. A spark plug in a properly running four-stroke engine should last for years and never appear oily or burned. If so, replace it.

Use a spark-plug tester to check for spark. If you don’t have one, clip the spark-plug boot onto the plug, hold the plug against the metal cylinder head and slowly pull the starter cord. You should see a strong, blue spark. It helps to test the plug in a darkened garage. Replace the plug if you don’t see a spark or it appears weak.

While you’re at it, check the spark-plug gap and set it to the factory specifications noted in the lawnmower owner’s manual.

If you know the plug is good, but you still don’t have spark, the coil likely has failed and requires replacement.

Did you hit a rock or other obstacle?

We’ve all killed a lawnmower engine after hitting a rock or big tree root.

If your lawnmower won’t start in this scenario, you probably sheared the flywheel key. It’s a tiny piece of metal that aligns the flywheel correctly to set the proper engine timing. Hitting an immovable obstacle can immediately stop the mower blade (and crankshaft) while the flywheel keeps spinning, shearing the key.

In this case, the engine timing is off and the mower won’t start until you pull the flywheel and replace the key. It’s an easy enough job IF you have a set of gear pullers lying around the garage. If not, rent a set from a parts store (or buy one…there’s never a bad reason to buy a new tool) or visit the dealer.

My lawnmower starts, but runs poorly

If you finally get the lawnmower started, but it runs like a three-legged dog, try cleaning the carburetor with AMSOIL Power Foam. It’s a potent cleaning agent designed to remove performance-robbing carbon, varnish and other gunk from carburetors and engines.

Power Foam®

Buy AMSOIL Power Foam

Add gasoline stabilizer to avoid most of these problems

Which sounds better? Completing all these steps each year when your lawnmower won’t start? Or pouring a little gasoline stabilizer into your fuel tank?

Simply using a good gasoline stabilizer can help avoid most of the problems with a lawnmower that won’t start. AMSOIL Gasoline Stabilizer, for example, keeps fuel fresh up to 12 months. It helps prevent the lighter hydrocarbons from evaporating to reduce gum and varnish and keep the fuel flowing. It also contains corrosion inhibitors for additional protection.

Gasoline Stabilizer

Buy AMSOIL Gasoline Stabilizer

I have a five-gallon gas can in my garage from which I fuel two lawnmowers, two chainsaws, two snowblowers, a string trimmer, an ATV and the occasional brush fire. I treat the fuel with Gasoline Stabilizer every time I fill it so I never have to worry about the gas going bad and causing problems.

You can also use AMSOIL Quickshot. It’s designed primarily to clean carburetors and combustion chambers while addressing problems with ethanol. But it also provides short-term gasoline stabilization of up to six months.