Why is there this hard to Flush Slime in my Radiator?

Why is there Sludge or Slime in my Radiator?

Cooling-system issues account for nearly 40 percent of engine failures. Clearly, it pays to take care of your vehicle’s cooling system.

Sludge/slime are one of the common symptoms of larger problems. Left unchecked, it’ll plug the radiator, heater core or fluid passages, resulting in overheating and expensive repairs.

What causes sludge/slime and what can you do about it?

• Additives dropping out – coolant consists of a base (typically ethylene glycol or propylene glycol) mixed with additives and water. The base is primarily responsible for providing freeze and boil-over protection. The additives guard against corrosion, cavitation and scaling. Mixing of incompatible coolants can cause the additives to “drop out” of the solution and form sludge or slime.

• Contaminated coolant – a bad head gasket or cracked cylinder head can allow oil and coolant to mix, resulting in sludge. In vehicles with automatic transmissions, the engine-cooling system also cools the transmission. A breach in the system can contaminate coolant with transmission fluid.

• Corrosion – occurs when an imbalanced coolant chemically reacts with metallic surfaces, forming reddish deposits that can appear as sludge or slime.

Low-quality coolants can lead to cooling-system corrosion.

The only way to definitively identify what’s causing sludge/slime in your radiator is to perform fluid analysis. The report can identify oil, transmission fluid or other contaminants in the coolant. Fix any mechanical defects and flush the cooling system. Refill with a high-quality antifreeze/coolant.

What kind of coolant should I use?

Let’s start with what kind you should avoid.

You’re no doubt familiar with the conventional “green” coolants found at most retailers due to their low price. They contain inorganic salts, such as nitrites, phosphates and silicates.

Inorganic salts deplete quickly – typically in two years or less – and are on the environmental watch list. Once depleted, they are the source of common cooling-system problems, like scale deposits and sludge/slime.

Low-cost “green” coolants are the source of several problems, such as sludge/slime and scale deposits.

For these reasons, most vehicle manufacturers have moved away from inorganic salts for newer vehicles.

And so should you.

Instead, use a high-quality coolant that uses organic-acid technology (known as OATs). OATS coolants are much more robust and longer-lasting. They virtually eliminate drop-out, scaling and compatibility issues inherent to inorganic salts. This type of coolant can be used in a wide variety of applications, even mixing with other coolants as a top-off.

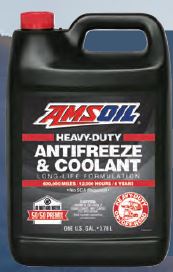
AMSOIL Antifreeze/Coolants

AMSOIL offers three coolants, all of which offer a unique blend of organic acids. We use di-acid technology, which means both ends of the organic acid are active. This makes them work faster and form stronger bonds for enhanced protection.

A Simple Way To Fight Cylinder-Liner Cavitation

A SIMPLE WAY TO FIGHT CYLINDER-LINER CAVITATION

In extreme cases, cylinder-liner cavitation in diesels can allow oil and coolant to mix. Then it’s just a matter of time until engine failure. Here’s what you can do to help ensure that doesn’t happen.

Most diesel engines are designed with replaceable cast-iron cylinder liners that are pressed into the engine block. While this doesn’t apply to turbodiesel pickups, it affects heavy-duty over-the-road trucks and other diesels. The piston moves up and down inside the liner, while a jacket of coolant surrounds the outside of the liner to cool the engine.

How cylinder-liner cavitation occurs

When the engine is running, the pistons move vertically inside their liners several thousand times per minute. Meanwhile, the rotary motion of the crankshaft applies a thrust force through the connecting rods to the piston. These contradictory movements cause the pistons to hammer the liners, causing significant vibration, similar to the effect of ringing a bell. This vibration can cause air bubbles to form in the coolant surrounding the liner.

When the bubbles rupture, they direct a high-pressure stream of coolant at the liner. Like a rushing river carving away a canyon wall, the coolant can erode the liner until cavities form. Left unchecked, these cavities can keeping growing and eventually penetrate the liner, allowing oil and coolant to mix. Once that happens, it’s only a matter of time before the engine fails.

Prevention is the best practice when it comes to cavitation. That task falls on the engine coolant, and there are two ways formulators typically design engine coolant to fight cavitation.

How Cylinder Liner Cavitation Occurs
Imploding bubbles direct high-pressure
coolant toward the cylinder liner, creating
cavities through which the coolant can enter
and mix with oil, damaging the engine.

The old-fashioned way

For years, formulators have added metallic salts, like nitrites and molybdenates, to coolant that attach themselves to the liner and form a sacrificial layer. When the coolant bubbles implode, the metallic salts absorb the pressure and break off from the liner surface rather than the metal itself. Metallic salts naturally deplete over time, meaning motorists must replenish them periodically by adding a supplemental coolant additive (SCA) to the coolant reservoir, typically midway through the service interval. Unfortunately, this is often overlooked.

The better way

The trend in the coolant market – and the strategy we use at AMSOIL – is to eliminate adding an SCA by formulating coolant with organic acid technology (OAT). The chemistry of OAT coolants passivates the liner surface, which coats it in a thin, inert layer that provides protection against cavitation and corrosion. Unlike old-fashioned metallic salts, the additives in OAT coolants last much longer, meaning you don’t have to replenish the system with an SCA. Modern OAT coolants also help fight problems associated with old fashioned “green” coolants, like scaling and additive drop-out (which leads to “slime” in your coolant system) due to incompatibility issues.

Coolant Maintenance is Key – Don’t forget about the most forgotten system

Aside from using an OAT coolant, it’s good practice to check your coolant level periodically. Also, make sure to check the pH and glycol levels annually. Glycol is important to the level of freeze protection and the coolant’s boiling point. Over time, the water can evaporate from the system and increase glycol concentration, throwing off the coolant’s balance. Perform fluid analysis once a year for best performance. We offer that service through Oil Analyzers INC. (www.oaitesting.com). We also offer antifreeze test strips (G1165).

Using AMSOIL Heavy Duty Antifreeze & Coolant (ANTHD) and taking care of your diesel’s cooling system go a long way toward avoiding the financial pain of fixing an engine ruined by cylinder-liner cavitation.

We keep this one in the Omaha store due to requests. If you need more than a case of four we can have it delivered next day or shipped to your home.

  • Pre-mixed 50/50 with high-purity water.
  • Fully formulated: DOES NOT require the use of supplemental coolant additives (SCAs) or excenders.
  • All-organic formulation is further enhanced with anti-scalant, anti-fouling and water-pump lubrication additives.
  • Phosphate-, nitrate-, nitrite-, silicate-, borate and amine-free.
  • Boil-over protection up to 265 F (129 °C) with a 15 psi radiator cap.
  • Freeze protection down to – 34 F (-37 °C)

Do Coolant Additives Work?

Do Coolant Additives Work?

Store shelves contain several coolant additives that promise to reduce engine heat, control overheating and fight corrosion.

Do coolant additives work? And, if so, are they necessary?

It’s tough to top good ‘ol H2O

First of all, why use coolant additives in the first place?

Straight water is the best coolant one could use. It absorbs and transfers heat better than any other liquid. So, why not just pour purified water into your coolant system and call it done? 

The answer is obvious for those of us who drive in snow six months a year and those of you who face triple-digit temperatures all summer.

Water freezes at 32°F (0°C) and boils at 212°F (100°C).

Clearly, coolant formulators must add something to antifreeze & coolant to expand its application to areas where the weather isn’t perfect 365 days per year. Otherwise your engine would freeze in winter and your cooling system would overheat in summer.

Corrosion control

Not only that, but water corrodes metal.

Running straight water in your vehicle’s cooling system would eventually lead to scale buildup that would plug the heater core and ruin the system.  

It can also hasten corrosion in aluminum components, like radiators and cylinder heads, at an alarming rate. Corrosion can eat through an aluminum radiator until coolant leaks on the ground.

At the very least, drivers in the perfect climate still need to add corrosion inhibitors to straight water to properly cool an engine.

In fact, many racers do this with good results; racetracks typically don’t allow antifreeze & coolant since leaks are difficult to clean up and make the track slippery.

A good antifreeze & coolant hits the mark

A high-quality antifreeze & coolant contains the chemistry needed to deliver protection against freezing, boil-over and corrosion.

A word of caution, however: Avoid the conventional “green” coolants readily found at parts stores and other retailers. 

They contain inorganic salts (phosphate, nitrate, nitrite, silicate, borate, amine), which are responsible for almost all cooling-system scaling problems.

Plus, they deplete quickly, often in two years or less, and can lead to sludge or slime in your radiator, which clog passages and create all sorts of problems.

AMSOIL antifreeze/coolants, on the other hand, deliver durable, long-lasting cooling-system protection.

So, why use coolant additives?

If a good antifreeze & coolant works so well, why bother with coolant additives that promise reduced engine temperatures and added corrosion resistance?

Because racers, competitors and enthusiasts want every advantage they can get to enhance engine performance. And a good coolant additive can provide that edge. 

Reduced engine temperatures

An engine has a temperature “sweet spot” in which it produces maximum power and efficiency. Excessive heat reduces efficiency. It can cause metal parts to expand too much and contact each other, causing wear.

Competitors have a big incentive to tame extreme engine temperatures to protect their expensive engines and maximize their chances to win.

A good coolant additive can help by reducing the surface tension of water and allowing it to more efficiently absorb and transfer heat from the engine.

What are surfactants?

Coolant additives use chemicals called surfactants.

When water is agitated or heated, surface tension holds bubbles together before they burst. Since bubbles are filled with air, they reduce the water’s heat-transfer ability.

Imagine thousands of bubbles in the coolant passages of your engine as it runs. Eliminating these bubbles will allow the water to more closely contact metal, increasing its ability to absorb heat, thereby reducing operating temperatures and increasing efficiency.

Surfactants reduce the water and antifreeze’s surface tension so it can more effectively absorb and transfer heat from the engine.  

Many leading coolant additives, however, contain only one surfactant, limiting their temperature ranges and effectiveness.

AMSOIL DOMINATOR Coolant Boost uses three surfactants, each designed to operate in a different temperature range to increase liquid-to-metal contact from the time the vehicle starts to the time it reaches operating temperature.

As a result, it reduces engine temperatures up to 25°F (14ºC) in straight-water applications.

This helps racers and competitors achieve maximum efficiency and horsepower.

Faster engine warm up

More efficiently transferring engine heat also helps DOMINATOR Coolant Boost warm the engine up to 54% faster.

Racers appreciate this since they waste less fuel warming their engines.

Motorists in cold climates like it because it boosts driver comfort on cold mornings.

Improved corrosion resistance

DOMINATOR Coolant Boost also delivers outstanding corrosion protection. In industry standard testing, it limited corrosion to the six metals most commonly found in cooling systems (copper, solder, brass, steel, cast iron and cast aluminum), easily passing both tests.

Check out the full results here.

Dominator Coolant Boost

Oil Analysis Kits – They’re Easy

How to Perform Oil Analysis

We keep these kits right here in the Omaha store. Ask for the one with postage or with out for a slight savings. When doing several vehicles use the one w/o postage to send all together.

Used oil analysis is one of the most potent tools in your vehicle-maintenance arsenal. It effectively provides a glimpse inside your engine to gauge lubricant and component condition without so much as removing a bolt or bloodying a knuckle. And it’s simple and inexpensive. Here’s how to perform oil analysis.

What is oil analysis?

First, let’s define our terms.

Oil analysis is the process of chemically analyzing a lubricant sample (typically used motor oil) to determine lubricant and engine or component condition.

You take a sample of the lubricant and ship it to a qualified laboratory. Technicians subject the lubricant to a range of tests to determine the concentration of wear metals, fuel dilution, the lubricant’s total base number (TBN), oxidation and other information. The lab sends you a report that shows lubricant condition and includes a brief explanation and recommendations for future service.

The benefits of oil analysis

Determining the condition of the oil inside your engine offers a number of benefits, all of which save you time, money and hassle in the future.

Maximize oil drain intervals

Monitoring the condition of the oil allows you to optimize drain intervals so you can capitalize on the fluid’s full service life. Performing fewer oil changes minimizes maintenance costs and, for businesses that depend on vehicle availability, maximizes uptime. It also vastly reduces the amount of waste oil you have to truck to the recycling facility, helping the environment.

Extend equipment life

Monitoring system cleanliness and filtration efficiency can help you keep your vehicles and equipment longer and significantly reduce replacement costs.

Prevent major problems

Oil analysis identifies dirt, wear particles, fuel dilution, coolant and other contaminants that can cause catastrophic failure or significantly shorten equipment life. Arming yourself with this information allows you to proactively fix problems before they spiral out of control.

Maximize asset reliability

For businesses that maintain vehicle fleets, testing and analysis ensure that equipment is up, running and making money instead of laid up in the shop.

Increased resale value

Performing oil analysis provides valuable sampling history documentation that can justify higher equipment resale values.

How to perform oil analysis

To demonstrate how easy it is to perform oil analysis, I obtained an oil analysis kit from Oil Analyzers INC. and identified the perfect subject from my family fleet – my trusty 1998 Toyota Corolla. I thumped down exactly $2,995 for the car more than three years ago, and it’s been bulletproof ever since. In fact, it was used in this demonstration of how to test engine compression. Check it out to see how it performed.

Here’s what you’ll need to perform oil analysis on your vehicle

1) Warm up the engine

Warm oil flows more easily through the sampling pump. In addition, circulating the oil prior to drawing a sample ensures consistency. Just run the vehicle for a couple minutes; there’s no need to bring it up to operating temperature.

2) Draw the oil sample

Using a vacuum pump is the easiest and cleanest way to accomplish this. It allows access to the oil sump through the dipstick tube. Thread a clean sample bottle to the pump. Attach a length of clean hose to the top of the pump and tighten the lock ring.

PRO TIP: To know how much sampling hose to use, measure the dipstick and add a foot.

Insert the opposite end of the tube into the dipstick tube. It helps to cut it at a 45-degree angle to avoid snagging on bends or restrictions.

Once it bottoms out in the oil sump, retract the tube about an inch so it’s not pulling contaminants off the bottom of the oil pan. Pump the plunger until the bottle is 3/4 full.

Sometimes it’s impossible to draw a lubricant sample through the dipstick tube. In these cases, you can pull the sample straight from the reservoir, although it’s messier. If this is the case, allow the lubricant to drain for a couple seconds before catching a sample in the bottle so contaminants that have settled around the drain plug are flushed out. Quickly reinstall the drain plug and top-off the reservoir.

3) Ship the oil sample

Most oil analysis kits come with the appropriate labels and directions for shipping it to a lab. Follow the instructions, then hang tight until the results arrive.

4) Read the results

I can’t speak for all oil analysis labs, but Oil Analyzers INC. typically returns results in about two days after receiving the sample. I received a PDF in my inbox the day after the lab had received the oil sample.

Shop Oil Analysis Kits

The lab sends a report that includes application information, elemental analysis and recommendations. The amount of information varies depending on the kit you use.

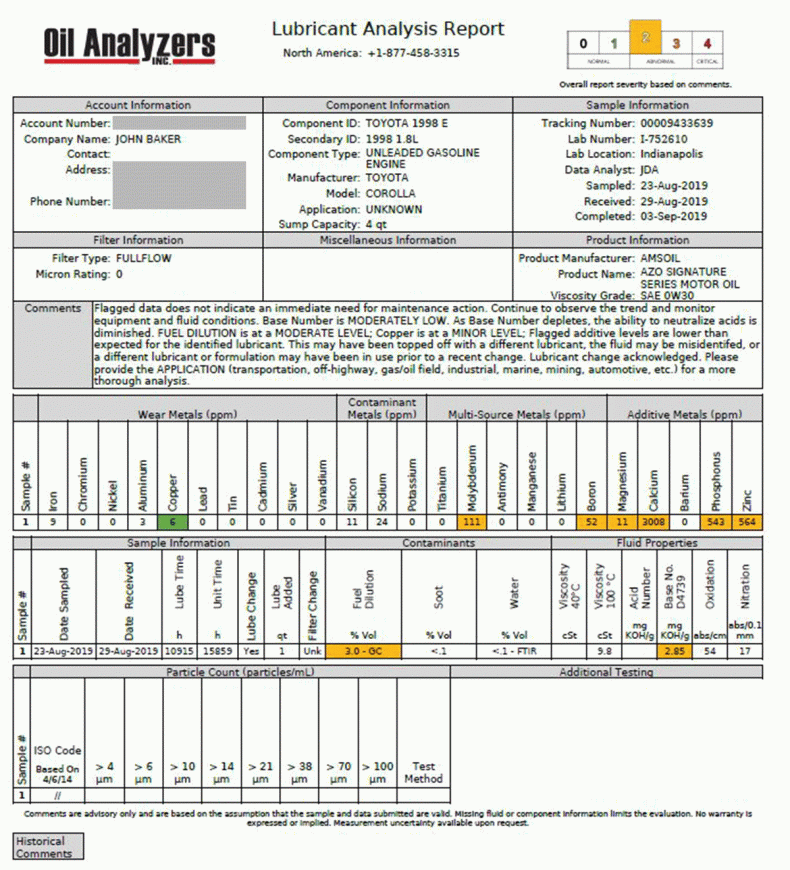
Let’s take a look at the report for my ’98 Corolla.

oil analysis sheet

It’s important to note that I put 10,915 miles on the oil over the course of 11 months. First, notice the severity status level in the upper right. It provides a quick reference to determine the status of the sample.

  • Severity 0 (Normal) = Oil is suitable for continued use.
  • Severity 1 (Normal) = Oil is suitable for continued use. Observe for trends in future tests.
  • Severity 2 (Abnormal) = Oil is suitable for continued use. Resample at half the normal interval.
  • Severity 3 (Abnormal) = Replace oil filter and top-off system with fresh oil. Resample at half the normal interval or change oil.
  • Severity 4 (Critical) = Change oil and filter if not done when sample was taken.

My sample fell into the Severity 2 category. Why?

Notice the Multi-Source Metals and Additive Metals highlighted in yellow.

The information in the Comments section explains why: “Flagged additive levels are lower than expected for the identified lubricant. This may have been topped off with a different lubricant, the fluid may be misidentified, or a different lubricant or formulation may have been in use prior to a recent change.”

Nailed it.

I’m guilty of having topped-off the engine with a different AMSOIL product than the Signature Series 0W-30 Synthetic Motor Oil initially used for the oil change 11 months earlier. This report shows why you shouldn’t mix lubricants, if possible. Sure, it won’t do lasting harm to the engine, but mixing lubricants disrupts the oil’s chemistry and can shorten its service life and reduce performance.

Learn from my negligence, friends – don’t mix engine oils.

Reading an oil analysis report

You can also see fuel dilution is moderately high while TBN is moderately low. As Allen Bender, Oil Analyzers INC. Manager told me, the TBN is no cause for concern and there is “considerable time” before the oil would have to be changed.

All in all, this is a good report for a 21-year-old engine with more than 150,000 miles, most of it using who-knows-what motor oil.

Wear metals are low, meaning the oil is doing a great job protecting the bearings and other components from wear. Contaminants are also low, meaning the air filter is capturing silicon and other debris before it reaches the engine. The report shows no glycol contamination, which means the engine coolant is where it’s supposed to be – in the cooling system – and not in the oil via a leaking head gasket or other issue. And oil viscosity and oxidation are both good, showing that the oil is holding up fine, even after 11 months.

The one area that provides a little concern is 3-percent fuel dilution. As noted, this is a moderate level and shouldn’t cause alarm, but it is something to watch.

This is a perfect example of the power of oil analysis. It allows me to monitor the fuel-dilution level and potentially take action if it increases to a problematic level. Knowing the engine suffers moderate fuel dilution also reinforces the importance of using a high-quality synthetic oil (and not mixing oils!) to ensure maximum protection.

Give oil analysis a try. It’s relatively cheap for the information it provides and it empowers you to take better care of your vehicles while maximizing their return on your investment.

Shop Oil Analysis Kits

We have all the main oil analysis kits here in the Sioux Falls store. 47073 98th st. Just behind Marlins found at Exit 73 on I-29.

605-274-2580


Prepare Your Vehicle for Winter

Prepare Your Vehicle for Winter

Originally posted Nov. 11, 2016

With the worst of winter right around the corner, now is a good time to get your vehicle prepared for the worst. Being based in northern Wisconsin, we at AMSOIL talk a lot about how synthetic lubricants make life a little easier, as the cold air starts to pierce our engines and lungs.

Wherever you may be, nasty road conditions and winter driving can be dangerous, so it’s always a good idea to plan ahead. Weather.com blogged about how bad-weather car accidents are more deadly in the U.S. than many of the worst storms.

Snow, rain, fog and wet pavement all pose a hazard during the season. To be ahead of the game, here are some preparedness tips:

Garage Time

  • Battery check – Cold temperatures are a battery killer. Be sure you’ve got the juice to keep going. Check the terminals for corrosion that needs cleaning and ensure the alternator and belts are in good shape.
  • Antifreeze and coolant – Look for any radiator and hose leaks and top off the reservoir, if necessary. If it’s been several years since you’ve changed the coolant, be sure to get some fresh fluid in there.
  • Windshield wipers and fluids – Make sure the wipers are working and the blades are not worn. Fill the washer reservoir with a good-quality fluid that doesn’t freeze.
  • Brake system– Being able to stop is crucial when roads are slick. Look to see that the floor mats aren’t blocking the pedal. If you notice braking issues, have the brake fluid, pads, rotors and lines checked.
  • Tire pressure and tread – Tires should be checked monthly for wear and proper inflation regardless of the season. Make sure you have a spare tire, and keep a pressure gauge in the vehicle with you.
  • Fuel and oil level – It’s a good idea to keep your fuel tank at least half-full in case you get stranded on the side of the road and need to stay warm. Motor oil should also be topped off.

Emergency Roadside Kit

  • Flashlight – I like to carry an LED flashlight in my truck since they last a long time. But a traditional flashlight works well and tends to be brighter.
  • Tool kit – It should have the basics, including screwdrivers, pliers, an adjustable wrench and a socket set. Work gloves, tape, fuses and a good pocket knife or multi-tool are all handy to have as well.
  • Blanket – Not only does it keep you warm in winter, but it can also block out wind and help treat shock victims.
  • Jumper cables – It’s best not to settle for chintzy. Good-quality, thick cables with multi-strand wire, heavy duty clips and extra length can save you from headaches. Invest in four-gauge, 20-foot cables that won’t break the bank and will last a long while.
  • Food and water – Keep a stash of high-energy foods such as granola bars and nuts in the car.
  • Fire extinguisher – Often overlooked, but good to have. A multipurpose A-B-C type is the way to go.
  • First-aid kit – Any kit should contain bandages, gauze and prep pads to stop bleeding and prevent infection.
  • Other items to consider – Maps, shovel, broom, ice scraper and flares.

Even if you don’t get any snow, it’s good to be ready for any emergency. Got any more tips to share? Let us know in the comments.