MUSCLE CAR MANIA: Chevy* Power

MUSCLE CAR MANIA: Chevy* Power

We look under the hood at classic Chevy muscle car engines and the products to protect them.

_by Brad Nelson|March 1, 2024

The glory days of the muscle-car era were fueled by a war between American automakers for stoplight-to-stoplight power and speed. The victors were speed demons who craved increasingly powerful engines that were stuffed into sleek small and midsized sedans. These large-displacement engines offered thunderous excitement with rubber-shredding horsepower. Eventually, stricter emissions, oil embargoes and skyrocketing insurance premiums brought the golden age of American muscle to an end, but legends never die. In this edition of Muscle Car Mania, we delve into a few of the mythical Chevrolet* muscle-car engines that were too good to forget.

SMALL BLOCK

In the early 1950s, the hot-rod community shrugged Chevy off with its reliable, but underwhelming, Stovebolt Six* engines. But everything changed in the fall of 1954 with the launch of the groundbreaking small-block V8. Once speed enthusiasts discovered this lightweight, compact powerhouse, it outshined the flathead Ford* as the star of the strip. The first-generation small-block Chevy V8 has had an impact like no other eight-cylinder engine in history due to its simplicity and compact power. These engines were easy to work on, with opportunities to upgrade components. The first-generation small blocks offered variants that approached 400 horsepower by the early 1970s. Affordable and easy to find, the original small block remains the most popular high-performance classic-car engine in the world.

265 V8

In 1955 and ’56, the 265 small-block V8 powered over half of all new Chevys. The engine came in three configurations: the 162-hp two-barrel, the 180-hp Power Pack* with four-barrel and dual exhaust and the coveted 195-hp Super Power Pack* with a solid-lifter Duntov* cam, higher-compression pistons and free-flowing dual exhaust. Over the next couple years, the 265 added dual four barrels and fuel injection to put out 283 horses in 1957, 327 hp in 1962 and 350 hp in 1966. Horsepower ratings reached up to 375 in the Corvette.* In all, over 1.5 million 265-powered Chevrolets were sold.

283 V8

The 238 V8 powered vehicles from 1957 to 1967. It was incredibly versatile, but classic-car enthusiasts remember it as the first production engine that could produce one horsepower per cubic inch of displacement using a Duntov camshaft and Ramjet* fuel injection. Enthusiasts upped the ante by boring the cylinder walls for up to 301 cubes. In the ’60s, enthusiasts started adding larger intake valve heads and dual carbs, or an aluminum high-rise four-barrel Carter* AFB or Holley* intake.

L65 327 V8

From 1958 through 1964, Chevy bored and stroked the 283 to 327 cubic inches. The highest factory rating for the 327 in 1964 and ’65 was 375 hp in Corvettes with Ramjet fuel injection. The power curve was 2,700 to 7,200 rpm. Some 327s were equipped with a new 750- cfm, dual-inlet Holley 3310 carb for even more power.

348 V8

The 348 V8 was originally designed for heavy-duty trucks, but to enhance performance, Chevy added more

compression, a high-lift camshaft and tri-power induction. The production model was a torque beast capable of making over 300 horsepower to about 5,500 rpm. The 348 frequently put Chevy in the winners circle in 1960 and ’61.

409 V8

“Giddy up, giddy up, 409,” sang the Beach Boys in their hit song “409” about a “four-speed, dual-quad, posi-traction 409.” In 1961, the famous 348 was taken to another level with a high-performance variant known as the 409, a bored and stroked 348 with larger head ports and valves. Despite heavy pistons, the 409 was the engine to beat in everything except NASCAR* races, where the weighty pistons hammered away at reliability. But almost all top professional drag racers ran and won with a 409 in 1962 and ’63.

L78 396

In 1965, two Turbo Jet* 396 big-block engines replaced the 409, one of which was the factory-rated 425 hp RPO L78, a high-performance engine with rectangle-port heads, 11.0:1 compression and an aluminum high-rise intake manifold with an 800 cfm Holley carb. The L78 was put into Corvettes for an extra cost of $292.70. At the time, the L78 396 provided the highest acceleration and top speed of any production engine Chevrolet ever produced.

L72 427

The L72 427 V8 was first put into 1966 Corvettes, and later into the massive full-size passenger cars of the era. The engine was marketed at 450 hp for 1966 models, but later reduced to 425 hp, ostensibly to reduce insurance rates for would-be owners. Regardless, the L72 427 was a winner on all fronts and became the foundation for all Chevrolet solid-lifter big-block engines through 1969. Muscle cars using the L72 include the Chevelle,* Nova* and Camaro.*

427 L88

The 1967-1969 production 427 L88 race engine was marketed at only 430 hp at 5,200 rpm, but at 7,400 rpm, the 12.5:1-compression, mega-cam, rectangle-port 427 could churn out 550 hp. Only available in the Corvette, this engine put out so much heat that it was very difficult to keep cool, but it could slay other engines in street races.

454 BIG-BLOCK V8

The Chevy 454 big-block V8 was the right engine at the wrong time. GM* introduced the 454 in 1970, one year before emission standards were tightened and three years before the gas crisis hit. It was unfortunate timing for the mighty V8 designed for performance cars, including the Chevelle and Corvette, but the 454 made an indelible mark nonetheless. With high compression, solid-lifter camshaft, huge valve lift and massive 800 cfm Holley carburetor, output was listed at 450 hp and 500 lb-ft of torque, which was more than enough to shred tires at the drop of a hat.

PROTECT YOUR CHEVY POWER

If you’re lucky enough to have your foot on the accelerator of a legendary Chevy V8, protection is priority. Here’s a list of AMSOIL products to help keep your classic muscle car ripping far into the future.

AMSOIL Assembly Lube

As they say, a great engine isn’t built in a day. Partially assembled engines can sit idle for weeks or months at a time. During this process, an engine-assembly lube must be applied that will cling to parts and provide wear protection, inhibit rust and help prevent deposit formation. AMSOIL Engine Assembly Lube handles all of the above.

AMSOIL Break-In Oil

Break-In Oil (SAE 30)

Freshly rebuilt engines should start off with AMSOIL Break-In Oil. It’s formulated with zinc and phosphorus anti-wear additives to protect critical components during the break-in period when engine wear rates are highest. It doesn’t contain friction modifiers to allow for quick and efficient piston-ring seating, an important aspect of the break-in process to ensure maximum power and engine longevity.

AMSOIL Z-ROD® Synthetic Motor Oil

AMSOIL Z-ROD® is engineered specifically for classic and high-performance vehicles to perform on the street and protect during storage. It features a high-zinc formulation that protects flat-tappet camshafts and critical engine components, along with a proprietary blend of rust and corrosion inhibitors for added protection during long-term storage. It’s available in 10W-30, 10W-40 and 20W-50 viscosities.

AMSOIL Miracle Wash® Waterless Wash and Wax Spray

AMSOIL Miracle Wash is a must-have for owners dedicated to keeping their vehicle’s appearance on par with its performance. Simply spray and wipe off to lift dirt away from the surface instantly. It leaves vehicles with a super-shiny finish that protects against dust, light dirt and harmful ultraviolet rays.

AMSOIL DOMINATOR® Octane Boost

DOMINATOR® Octane Boost

Early V8 models were designed to use leaded gasoline. As a result, classic and collector autos often require the use of a lead substitute to preserve the components that were designed for the fuel of days gone by. AMSOIL DOMINATOR Octane Boost is excellent as a lead substitute in older vehicles. It increases octane up to four points, helping reduce engine knock and improving ignition while helping fuel burn more cleanly.

AMSOIL Gasoline Stabilizer

When it’s time to put her away at the end of the season, AMSOIL Gasoline Stabilizer is crucial to ensuring your ride is road-ready in spring. Gasoline can degrade in as few as 30 days. Treat your fuel tank prior to parking the vehicle for the winter to help prevent fuel degradation and poor engine performance when it’s time to fire it back up.

AMSOIL Engine Fogging Oil

Engine Fogging Oil

Any engine facing storage or lengthy inactivity should be treated with a good dose of AMSOIL Engine Fogging Oil first. Giving the cylinders a shot of oil protects them from rust, corrosion and harmful dry starts when it comes time to fire up your hot rod or classic car the following season.

video
play-sharp-fill

*All trademarked names and images are the property of their respective owners and may be registered marks in some countries. No affiliation or endorsement claim, express or implied, is made by their use.


Small engine won’t start? Identifying the Cause.

Small engine won’t start?

Bad gas is the number-one reason, and here’s how to prevent it.

Len Groom | TECHNICAL PRODUCT MANAGER, POWERSPORTS

In northern Minnesota, where I live, the temperature occasionally breaks 80ºF (27ºC) in the summer. When it does, it’s time to fire up my Jet-Skis* and hit the lake. The last thing I want to do on a sunny summer day is mess around with equipment that refuses to start or run properly.

Bad gasoline is the number-one reason seasonal equipment starts hard or runs rough. Over time, gasoline changes, leaving behind gums, varnish and other solids that foul the fuel system and prevent gas from flowing into the combustion chamber. In severe cases, gasoline can change so dramatically that it no longer ignites.

Gasoline is predominantly a mixture of carbon and hydrogen atoms bonded together into energy-dense hydrocarbons. Like conventional base oils, it’s derived from crude oil via a distillation process that uses heat, pressure and other catalysts to create different fractions. Gasoline is comprised of hydrocarbons that are lighter than those found in, for example, diesel fuel or conventional base oils. Refiners add ethanol to the formulation, typically 10 percent, but as high as 85 percent.

Time Takes Its Toll – You Must Treat Gasoline

Time, however, takes its toll on gasoline. Exposure to heat, humidity, atmospheric pressure, oxygen and other variables degrade fuel.

In addition to gums and varnish becoming more concentrated and less soluble as lighter hydrocarbons evaporate, gas is continually oxidizing, which further contributes to varnish and other gunk. Gasoline oxidizes more quickly than motor oil and its negative effects are more immediately noticeable. That’s why it’s important to use high quality gas and store it in approved containers where air infiltration is limited, like inside a ventilated garage or shed, and not in the back of your truck or under the deck.

Meanwhile, ethanol added to gasoline at the refinery can absorb water from the atmosphere, which can lead to phase separation, which occurs when ethanol and gas separate, much like oil and water. Ethanol that has absorbed enough moisture and has sat long enough can foul the fuel system and prevent the engine from starting.

AMSOIL Fights Corrosion

AMSOIL provides corrosion protection Sea Foam® Motor Treatment can’t match, helping maintain power and performance and keeping metal looking like new even when subjected to salt water.  ?

? Based upon independent testing of AMSOIL Gasoline
Stabilizer obtained Nov. 8, 2018 and Sea Foam Motor
Treatment purchased Oct. 25, 2018 in a modified NACE
TM0172 using synthetic sea water per ASTM D665 part B.

This all sounds dire, but it’s nothing treating your gasoline with AMSOIL Gasoline Stabilizer (AST) can’t solve. Gasoline Stabilizer keeps fuel fresh up to 12 months. AMSOIL Quickshot® (AQS) stabilizes gasoline during short-term storage up to six months, in addition to providing potent cleaning benefits and protection against ethanol issues.

What does stabilizer do?

That explanation may suit some people, but this is Tech Talk, so let’s look at the chemistry behind gasoline stabilizers.

You’ve probably heard terms like “free radicals” and “antioxidants” in relation to your health. A free radical is an unpaired electron, and most are unstable and highly reactive. They can either donate an electron to, or accept an electron from, other molecules. This starts a chain reaction that can lead to oxidative stress and cell damage. Left unchecked, free radicals can lead to health problems, like cardiovascular disease and cancer. To help fight free radicals, we should eat plenty of foods rich in antioxidants, which lessen their effects. Antioxidants can “donate” an electron to free radicals or trap them, effectively reducing their instability without becoming unstable themselves. Antioxidants aren’t silver bullets, but they go a long way toward improving our health.

By analogy, gasoline stabilizer is an antioxidant for your gasoline. It disrupts the free-radical-induced chain reaction that causes gas to oxidize and form varnish and gums. Some stabilizer products, like Quickshot, also contain chemistry that increases solvency and breaks down existing varnish, helping clean a dirty carburetor and restore performance. As shown, Gasoline Stabilizer also fights corrosion better than Sea Foam Motor Treatment.

Neglecting to stabilize your gas can lead to all sorts of headaches when it’s time to remove your lawnmower, generator, string trimmer or Jet-Ski from storage. For best results, stabilize your gasoline all year long. That’ll ensure your equipment is ready to roll when you are.

How to Store a Snowblower

How to Store your Snowblower properly. Prevent damage during summer season.

Storing a snowblower properly is vital to ensuring it fires up when the snow eventually returns. When the first storm of the season dumps eight inches of snow on your driveway, you don’t want to be messing around in the garage when your snowblower won’t start.

fuel stabilizer is key for storing the damn snowblower

Time needed: 30 minutes.

Step-by-step: How to store a snowblower

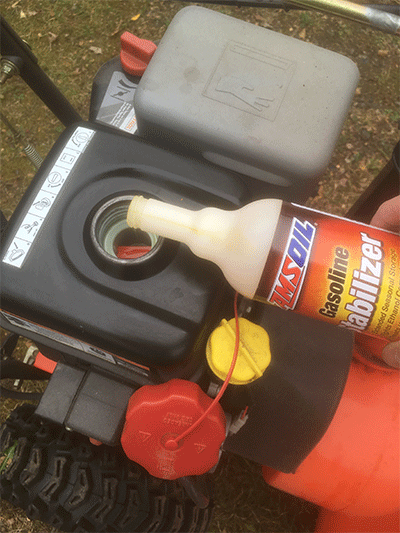
  1. Stabilize the gas

    This is the most critical step to ensuring the snowblower starts right away in the winter.

    Gasoline begins to break down in as few as 30 days. Varnish and gums begin to form, which clog the tiny fuel passages in the carburetor. I can tell you from experience that it doesn’t take much to clog a snowblower carburetor and prevent it from starting.

    AMSOIL Gasoline Stabilizer keeps fuel fresh up to 12 months. As the image shows, it also does a great job fighting corrosion to keep metal fuel tanks and other components clean and working properly. After adding stabilizer, run the engine for a minute or two to distribute treated gas throughout the fuel system.

    Seafoam sucks

  2. Change the oil

    Running the engine to distribute gas stabilizer has the added benefit of warming the oil so it flows more easily.

    Changing oil before you store your snowblower removes acids and other combustion by-products so they’re not sitting in the engine throughout the summer. Plus, the engine will be ready with fresh oil come winter.

    Don’t cheap out on oil – you likely spent upward of $1,000 on your snowblower, so you want it to last. Plus, small engines are tougher on oil than most people think. They’re air-cooled, meaning they run hotter than automotive engines, typically don’t include an oil filter, further stressing the oil, and are often neglected.

    AMSOIL Synthetic Small-Engine Oil is a commercial-grade formulation that fights wear and deposits in the toughest conditions. It also flows readily in the cold for maximum start-up protection.

  3. Fog the engine

    Simply remove the spark plug and apply fogging oil. It coats the cylinder wall and piston with oil to help prevent corrosion from forming during the summer. If corrosion forms, it flakes off into the oil and scours the bearings and other components, causing wear.

  4. Check the gear lube

    Remove the gearbox fill bolt and ensure the housing contains sufficient oil. Check your owner’s manual for the proper lubricant.

  5. Inspect the belts

    Now’s the time to check drive belts for cracks or abrasions. Replace them if needed.

    Otherwise, I promise you they’ll break at the worst time, like at 5:30 a.m. on a cold November morning after a wet, heavy snowfall. Be proactive and save yourself a ton of grief down the road.

  6. Check the linkages, auger housing and other areas

    Before you store a snowblower, look it over from top to bottom. Check for damaged parts and linkages. Lubricate pivot points with a spray protectant, like AMSOIL MPSpray the auger housing to guard against rust formation over the summer.

    Don’t overlook this step. While examining my snowblower last year, I realized three of the four bolts that hold the auger housing and chute (sometimes called the “bucket”) to the chassis had sheared. One bolt was literally holding the snowblower together.

    The following Thanksgiving weekend, two feet of snow blanketed Duluth, Minn. I spent eight hours moving snow. Imagine if I hadn’t repaired the snowblower the prior spring and that last bolt had given out halfway down my driveway?

    Again, be proactive now to avoid a ton of problems later.

  7. Store the snowblower inside

    Finally, park your snowblower in the back of the garage or in a shed for the summer to protect it against rain. If you have no choice but to store it outside, cover it securely. I bought a nice cover at Kmart a few years ago and it still does the job.

    Following these steps will help ensure your snowblower is ready to go the next winter.