
Oil Analysis Kits – They’re Easy

How to Perform Oil Analysis

We keep these kits right here in the Omaha store. Ask for the one with postage or with out for a slight savings. When doing several vehicles use the one w/o postage to send all together.

Used oil analysis is one of the most potent tools in your vehicle-maintenance arsenal. It effectively provides a glimpse inside your engine to gauge lubricant and component condition without so much as removing a bolt or bloodying a knuckle. And it’s simple and inexpensive. Here’s how to perform oil analysis.

What is oil analysis?

First, let’s define our terms.

Oil analysis is the process of chemically analyzing a lubricant sample (typically used motor oil) to determine lubricant and engine or component condition.

You take a sample of the lubricant and ship it to a qualified laboratory. Technicians subject the lubricant to a range of tests to determine the concentration of wear metals, fuel dilution, the lubricant’s total base number (TBN), oxidation and other information. The lab sends you a report that shows lubricant condition and includes a brief explanation and recommendations for future service.

The benefits of oil analysis

Determining the condition of the oil inside your engine offers a number of benefits, all of which save you time, money and hassle in the future.

Maximize oil drain intervals

Monitoring the condition of the oil allows you to optimize drain intervals so you can capitalize on the fluid’s full service life. Performing fewer oil changes minimizes maintenance costs and, for businesses that depend on vehicle availability, maximizes uptime. It also vastly reduces the amount of waste oil you have to truck to the recycling facility, helping the environment.

Extend equipment life

Monitoring system cleanliness and filtration efficiency can help you keep your vehicles and equipment longer and significantly reduce replacement costs.

Prevent major problems

Oil analysis identifies dirt, wear particles, fuel dilution, coolant and other contaminants that can cause catastrophic failure or significantly shorten equipment life. Arming yourself with this information allows you to proactively fix problems before they spiral out of control.

Maximize asset reliability

For businesses that maintain vehicle fleets, testing and analysis ensure that equipment is up, running and making money instead of laid up in the shop.

Increased resale value

Performing oil analysis provides valuable sampling history documentation that can justify higher equipment resale values.

How to perform oil analysis

To demonstrate how easy it is to perform oil analysis, I obtained an oil analysis kit from Oil Analyzers INC. and identified the perfect subject from my family fleet – my trusty 1998 Toyota Corolla. I thumped down exactly $2,995 for the car more than three years ago, and it’s been bulletproof ever since. In fact, it was used in this demonstration of how to test engine compression. Check it out to see how it performed.

Here’s what you’ll need to perform oil analysis on your vehicle

1) Warm up the engine

Warm oil flows more easily through the sampling pump. In addition, circulating the oil prior to drawing a sample ensures consistency. Just run the vehicle for a couple minutes; there’s no need to bring it up to operating temperature.

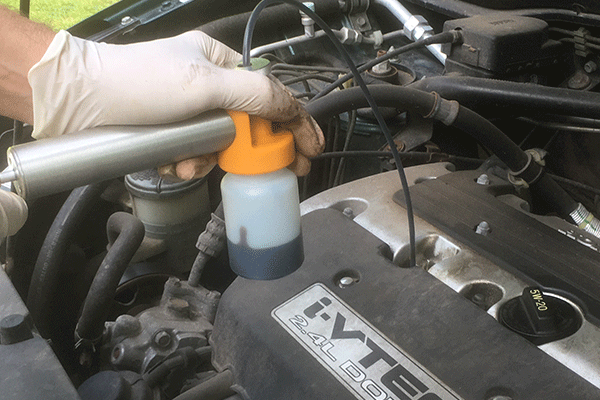
2) Draw the oil sample

Using a vacuum pump is the easiest and cleanest way to accomplish this. It allows access to the oil sump through the dipstick tube. Thread a clean sample bottle to the pump. Attach a length of clean hose to the top of the pump and tighten the lock ring.

PRO TIP: To know how much sampling hose to use, measure the dipstick and add a foot.

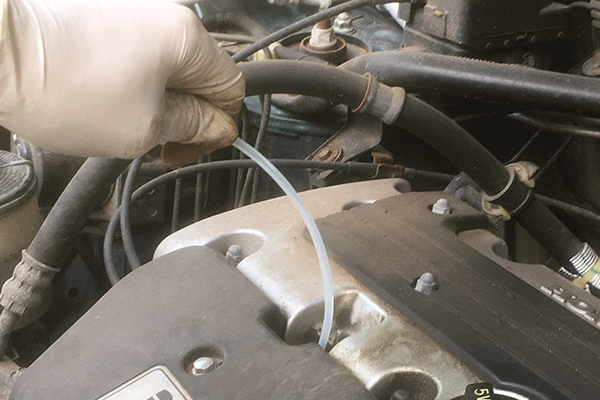
Insert the opposite end of the tube into the dipstick tube. It helps to cut it at a 45-degree angle to avoid snagging on bends or restrictions.

Once it bottoms out in the oil sump, retract the tube about an inch so it’s not pulling contaminants off the bottom of the oil pan. Pump the plunger until the bottle is 3/4 full.

Sometimes it’s impossible to draw a lubricant sample through the dipstick tube. In these cases, you can pull the sample straight from the reservoir, although it’s messier. If this is the case, allow the lubricant to drain for a couple seconds before catching a sample in the bottle so contaminants that have settled around the drain plug are flushed out. Quickly reinstall the drain plug and top-off the reservoir.

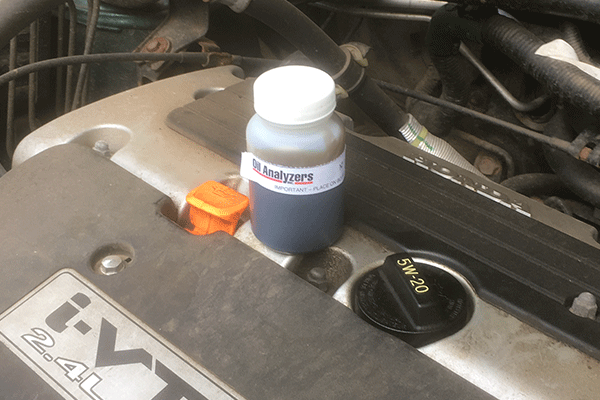
3) Ship the oil sample

Most oil analysis kits come with the appropriate labels and directions for shipping it to a lab. Follow the instructions, then hang tight until the results arrive.

4) Read the results

I can’t speak for all oil analysis labs, but Oil Analyzers INC. typically returns results in about two days after receiving the sample. I received a PDF in my inbox the day after the lab had received the oil sample.

Shop Oil Analysis Kits

The lab sends a report that includes application information, elemental analysis and recommendations. The amount of information varies depending on the kit you use.

Let’s take a look at the report for my ’98 Corolla.

oil analysis sheet

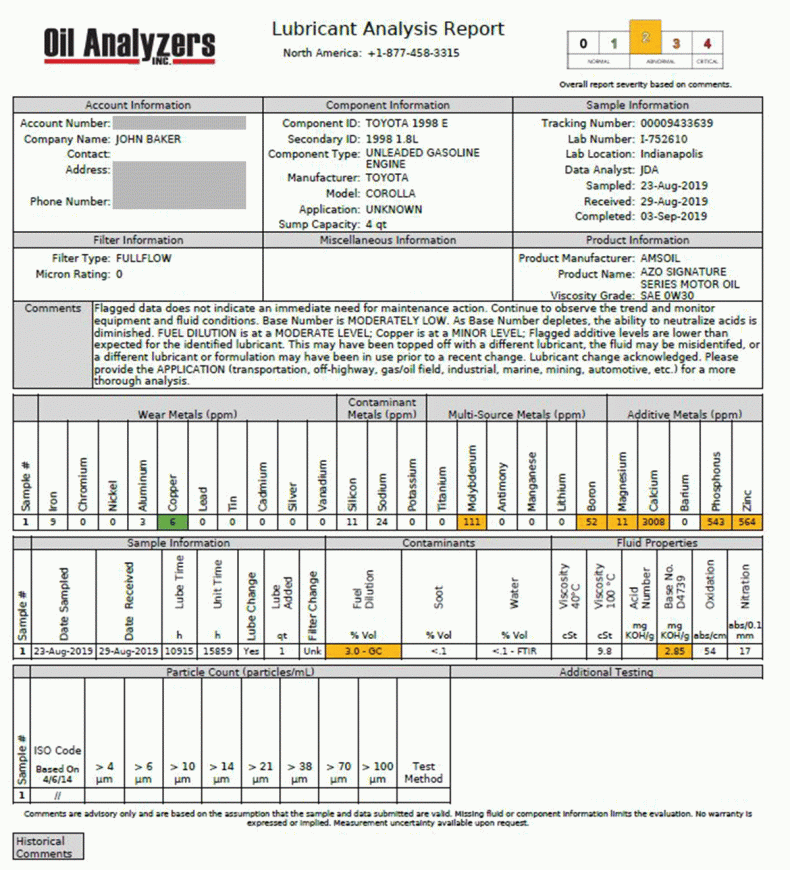
It’s important to note that I put 10,915 miles on the oil over the course of 11 months. First, notice the severity status level in the upper right. It provides a quick reference to determine the status of the sample.

  • Severity 0 (Normal) = Oil is suitable for continued use.
  • Severity 1 (Normal) = Oil is suitable for continued use. Observe for trends in future tests.
  • Severity 2 (Abnormal) = Oil is suitable for continued use. Resample at half the normal interval.
  • Severity 3 (Abnormal) = Replace oil filter and top-off system with fresh oil. Resample at half the normal interval or change oil.
  • Severity 4 (Critical) = Change oil and filter if not done when sample was taken.

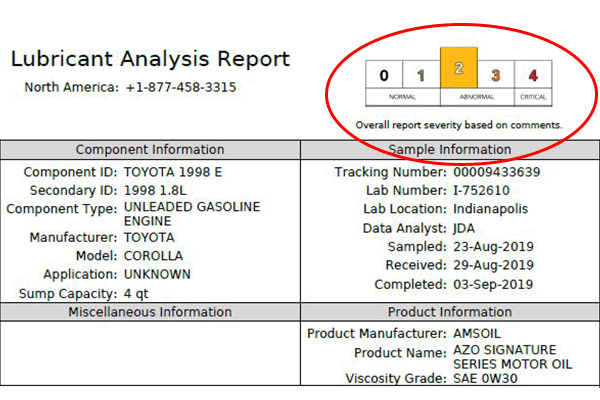
My sample fell into the Severity 2 category. Why?

Notice the Multi-Source Metals and Additive Metals highlighted in yellow.

The information in the Comments section explains why: “Flagged additive levels are lower than expected for the identified lubricant. This may have been topped off with a different lubricant, the fluid may be misidentified, or a different lubricant or formulation may have been in use prior to a recent change.”

Nailed it.

I’m guilty of having topped-off the engine with a different AMSOIL product than the Signature Series 0W-30 Synthetic Motor Oil initially used for the oil change 11 months earlier. This report shows why you shouldn’t mix lubricants, if possible. Sure, it won’t do lasting harm to the engine, but mixing lubricants disrupts the oil’s chemistry and can shorten its service life and reduce performance.

Learn from my negligence, friends – don’t mix engine oils.

Reading an oil analysis report

You can also see fuel dilution is moderately high while TBN is moderately low. As Allen Bender, Oil Analyzers INC. Manager told me, the TBN is no cause for concern and there is “considerable time” before the oil would have to be changed.

All in all, this is a good report for a 21-year-old engine with more than 150,000 miles, most of it using who-knows-what motor oil.

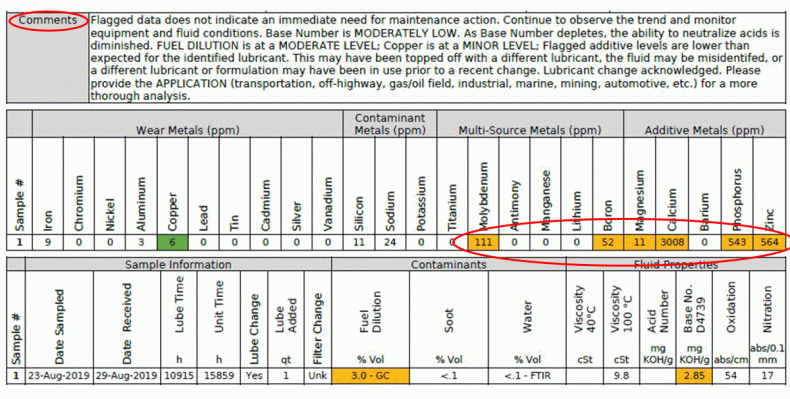
Wear metals are low, meaning the oil is doing a great job protecting the bearings and other components from wear. Contaminants are also low, meaning the air filter is capturing silicon and other debris before it reaches the engine. The report shows no glycol contamination, which means the engine coolant is where it’s supposed to be – in the cooling system – and not in the oil via a leaking head gasket or other issue. And oil viscosity and oxidation are both good, showing that the oil is holding up fine, even after 11 months.

The one area that provides a little concern is 3-percent fuel dilution. As noted, this is a moderate level and shouldn’t cause alarm, but it is something to watch.

This is a perfect example of the power of oil analysis. It allows me to monitor the fuel-dilution level and potentially take action if it increases to a problematic level. Knowing the engine suffers moderate fuel dilution also reinforces the importance of using a high-quality synthetic oil (and not mixing oils!) to ensure maximum protection.

Give oil analysis a try. It’s relatively cheap for the information it provides and it empowers you to take better care of your vehicles while maximizing their return on your investment.

Shop Oil Analysis Kits

We have all the main oil analysis kits here in the Sioux Falls store. 47073 98th st. Just behind Marlins found at Exit 73 on I-29.

605-274-2580


How to Store a Snowblower

How to Store your Snowblower properly. Prevent damage during summer season.

Storing a snowblower properly is vital to ensuring it fires up when the snow eventually returns. When the first storm of the season dumps eight inches of snow on your driveway, you don’t want to be messing around in the garage when your snowblower won’t start.

fuel stabilizer is key for storing the damn snowblower

Time needed: 30 minutes.

Step-by-step: How to store a snowblower

  1. Stabilize the gas

    This is the most critical step to ensuring the snowblower starts right away in the winter.

    Gasoline begins to break down in as few as 30 days. Varnish and gums begin to form, which clog the tiny fuel passages in the carburetor. I can tell you from experience that it doesn’t take much to clog a snowblower carburetor and prevent it from starting.

    AMSOIL Gasoline Stabilizer keeps fuel fresh up to 12 months. As the image shows, it also does a great job fighting corrosion to keep metal fuel tanks and other components clean and working properly. After adding stabilizer, run the engine for a minute or two to distribute treated gas throughout the fuel system.

    Seafoam sucks

  2. Change the oil

    Running the engine to distribute gas stabilizer has the added benefit of warming the oil so it flows more easily.

    Changing oil before you store your snowblower removes acids and other combustion by-products so they’re not sitting in the engine throughout the summer. Plus, the engine will be ready with fresh oil come winter.

    Don’t cheap out on oil – you likely spent upward of $1,000 on your snowblower, so you want it to last. Plus, small engines are tougher on oil than most people think. They’re air-cooled, meaning they run hotter than automotive engines, typically don’t include an oil filter, further stressing the oil, and are often neglected.

    AMSOIL Synthetic Small-Engine Oil is a commercial-grade formulation that fights wear and deposits in the toughest conditions. It also flows readily in the cold for maximum start-up protection.

  3. Fog the engine

    Simply remove the spark plug and apply fogging oil. It coats the cylinder wall and piston with oil to help prevent corrosion from forming during the summer. If corrosion forms, it flakes off into the oil and scours the bearings and other components, causing wear.

  4. Check the gear lube

    Remove the gearbox fill bolt and ensure the housing contains sufficient oil. Check your owner’s manual for the proper lubricant.

  5. Inspect the belts

    Now’s the time to check drive belts for cracks or abrasions. Replace them if needed.

    Otherwise, I promise you they’ll break at the worst time, like at 5:30 a.m. on a cold November morning after a wet, heavy snowfall. Be proactive and save yourself a ton of grief down the road.

  6. Check the linkages, auger housing and other areas

    Before you store a snowblower, look it over from top to bottom. Check for damaged parts and linkages. Lubricate pivot points with a spray protectant, like AMSOIL MPSpray the auger housing to guard against rust formation over the summer.

    Don’t overlook this step. While examining my snowblower last year, I realized three of the four bolts that hold the auger housing and chute (sometimes called the “bucket”) to the chassis had sheared. One bolt was literally holding the snowblower together.

    The following Thanksgiving weekend, two feet of snow blanketed Duluth, Minn. I spent eight hours moving snow. Imagine if I hadn’t repaired the snowblower the prior spring and that last bolt had given out halfway down my driveway?

    Again, be proactive now to avoid a ton of problems later.

  7. Store the snowblower inside

    Finally, park your snowblower in the back of the garage or in a shed for the summer to protect it against rain. If you have no choice but to store it outside, cover it securely. I bought a nice cover at Kmart a few years ago and it still does the job.

    Following these steps will help ensure your snowblower is ready to go the next winter.

No Day is a Bad Day on the Farm

No Day is a Bad Day on the Farm

Peter Davie is into milk. Stay with me on this one.

uses amsoil products to reduce expenses on farm

In the early ’50s, Peter Davie’s grandfather came across a piece of property in Delta, British Columbia, where the family runs its dairy farm to this day. Solely dairy since the ’60s, the Davie Farm is home to purebred Holstein cows.

Holstein cows are prized for their high production. The farm herd is 100 percent born and raised onsite and produces about 80 pounds of milk per cow per day. That’s a lot of cartons of milk.

With 240 acres to manage, there is a lot of mechanical equipment that needs maintenance. That means regular oil changes and greasing on the farm’s 12 tractors.

Using conventional oil, Davie’s tractors needed oil changes every 200 hours. Switching to AMSOIL products has extended the service interval to 800 hours.

Not only that, but AMSOIL products have helped keep Davie’s 1986 Ford TW-35 tractor running strong. Watch his story now.


video
play-sharp-fill

Low-viscosity doesn’t mean low quality

Low-viscosity doesn’t mean low quality

As motor oil viscosity continues to decrease, base oil and additive quality become more important.

Michael Meuli | VICE PRESIDENT, TECHNICAL DEVELOPMENT

Despite uncertainty surrounding future CAFÉ standards, fuel economy remains the biggest driver of innovation in the auto industry. One strategy for increasing fuel economy involves reducing energy lost to friction. Using lower-viscosity lubricants, which reduce pumping losses and flow easier at startup, helps automakers accomplish this goal. Just as we’ve become accustomed to 0W-20 oils, 0W-16 oil has entered the market and is recommended for the 2018 Toyota Camry and Honda Fit. People are wondering how much lower viscosity can go.

That’s because excessively low lubricant viscosity can reduce wear protection. Some people fear the fuel economy gains of modern low-viscosity oils aren’t worth the potential loss of wear protection. You should be familiar with the relationship between lubricant viscosity and wear protection, but it bears repeating.

Motor oil must develop a durable fluid film that separates engine components so they don’t rub together and wear out. As a rule of thumb, the higher the oil’s viscosity, the thicker the fluid film – and the better the wear protection.

That being the case, you might think it advantageous to throw out your 0W-20 motor oil and use 15W-50 instead. That’s a bad idea, and here’s why.

Modern engines are built with tighter clearances between parts than their predecessors. Let’s take the GM* 3.8L engines we test in our mechanical lab as an example. The clearances between the crankshaft journals and main bearings can be as low as .0007 inches. That’s thinner than a sheet of paper (about .004 inches).

During operation, oil continuously flows through tiny ports in the crankshaft journals to lubricate the journal/ bearing interfaces. It should form a strong, consistent oil film on which the crankshaft journals float as they spin, preventing them from touching the bearings. This is called hydrodynamic lubrication. Oil that’s too thick for the engine, however, may not flow fast enough to fill the clearances, allowing the high spots on metal surfaces to contact. This is called boundary lubrication.

In this case, using a higher viscosity oil than what’s recommended in your modern engine would lead to increased wear. Adding insult to injury, it would reduce fuel economy and increase operating temperatures as well.

Viscosity that’s too low, however, can have the opposite effect. Since viscosity is related to film thickness, low-viscosity oil may not develop an adequate fluid film to keep metal components separated, leading to wear. If bad enough, parts will eventually weld together and destroy the engine.

You can see how modern engines have put oil formulators into a bind. How do we formulate low-viscosity oils that maximize fuel economy while also providing good wear protection in today’s stressful engines?

In a word, quality.

Although oil film thickness is related to lubricant viscosity, film strength is a function of base oil and additive quality. We start with high-quality synthetic base oils that offer naturally high resistance to heat and chemical breakdown.

The challenge, however, is that lower viscosity oils tend to be more volatile, meaning they burn off more easily when exposed to high heat. If you ever look at a motor oil’s NOACK Volatility, you’ll notice volatility tends to increase as the oil viscosity decreases. This is of particular importance since most new vehicles are equipped with turbocharged engines, which generate increased heat. High volatility can lead to excessive oil consumption, which causes the oil to thicken, making it harder to pump through the engine and reducing fuel economy. Oil that has thickened can also lead to deposits and disrupt the additive balance.

That’s why only synthetic base oils can be used to formulate a 0W-16 motor oil. Conventional base oils are too volatile to meet requirements of low-viscosity oil.

Additives, too, play a vital role in low viscosity oils. We talked about boundary lubrication earlier. When in a boundary lubrication situation, protecting against metal-to-metal contact falls on the motor oil’s anti-wear additives, more so than with higher viscosity oils. The additives form a sacrificial barrier on metal parts that absorbs contact and protects the metal surfaces.

Motor oil quality has always been important, but modern low-viscosity oils underscore the point. That’s good news for Dealers selling the best oil on the market.

To help you reach this market, we introduced new OE 0W-16 Synthetic Motor Oil (OES) last month. We’ll monitor demand for 0W-16 oils and introduce additional formulations if demand dictates.

In the meantime, brace yourself for 0W-8 motor oil, which is already being tested in Japan.

Eastern South Dakota Mess Package

Thanks to AMSOIL’s Sprays Winter Kept at Bay

Cleaning and preventing big messes made easy. An arsenal of help.

AMSOIL aerosols deliver cleaning power and performance you can see immediately.

Mudslinger®

Provides a protective layer of armor against the accumulation of mud, dirt and snow on ATVs, UTVs and dirt bikes, easing clean-up.

Engine Degreaser

Effectively cleans engine surfaces by cutting through grease, oil and grime. Works on cold parts. No high pressure needed.

Glass Cleaner

Cuts through grease and grime faster than other leading glass cleaners, stays where you spray it and leaves no streaks. It’s really amazing.

Power Foam

Improves starting and performance by cleaning dirty intake systems and spark plugs, freeing sticky valves and removing gum, varnish and carbon deposits. One of the most bragged about AMSOIL products on Youtube.

Heavy-Duty Degreaser

Formulated with powerful and fast-acting solvents, attacking petroleum-based grime on a molecular level to loosen its hold on metal, concrete, engines and other surfaces. Easy to use, just not easy on the wallet but when you see the effort it saves, you’ll be mighty pleased. Use it on the toughest jobs – concrete, chains, old neglected parts, etc. Not just automotive.

Miracle Wash®

People come from Canada for this one. Unique dry car wash and polish delivers outstanding performance and quick, easy and economical application. No water or shirt required.


Here at AMSOIL in Sioux Falls you can not go right! You have to go left at the stop sign then we are are third building on the left.  47073 98th St.

Also find all these items at Stan Houston’s on W. 12th St. Look for the old Kmart. AMSOIL found on  the eastern wall by the parts department.